Autodesk Maya is the backbone of some of the most complex 3D pipelines in the world. Film studios, game studios, VFX houses, and animation companies run their entire production on it. It is the tool that built the worlds of Avatar, The Lord of the Rings, and hundreds of the most technically ambitious games ever made.
But if you have ever tried to import a 3D asset into Maya and had your carefully organised scene turn into an unmanageable mess, namespaces cluttering the Outliner, textures pointing to a folder that does not exist on your machine, geometry importing at a scale that dwarfs your entire scene, or rigs deforming in ways that make no anatomical sense, you know that Maya's power comes with a steep price in import complexity.
This guide covers the right way to import every major 3D file format into Autodesk Maya. Exact settings, common failure modes, step-by-step fixes, and the workflow habits that professional Maya artists use to keep their scenes clean and their pipelines moving.
Maya Import: The Two Methods You Need to Know
Before getting into format-specific workflows, it is worth understanding that Maya has two fundamentally different ways to bring external assets into a scene, and choosing the wrong one for the situation is a primary source of scene-breaking problems.
Method 1 - Import (Merge Into Scene)
File → Import
This brings the asset directly into your current Maya scene. All objects, materials, and nodes from the imported file become part of your active scene. This is the right method when you want to permanently add an asset to a scene and work with it as part of that scene's data.
Risk: Namespace conflicts. When Maya imports a file, it creates a namespace for the imported content (e.g. chair_01:mesh, chair_01:material). If you import the same asset multiple times or import assets with identical node names, namespace conflicts can clutter your Outliner and cause unexpected behaviour.
Method 2 - Reference (Non-Destructive Link)
File → Create Reference
This links an external file to your scene without merging its data. The referenced asset appears in your scene but its data lives in the external file. Changes to the source file propagate to every scene that references it automatically.
Best for: Assets used across multiple shots or scenes in a production pipeline. Character rigs, hero props, and environment assets that may be updated during production should almost always be referenced rather than imported.
Rule of thumb: For production pipelines, use references. For personal projects or one-off assets, use import.
How to Import FBX Into Maya

FBX is the most common format for game assets, character rigs, and assets sourced from other DCC tools. It is also the source of the majority of Maya import problems due to differences in how various applications export FBX data.
Step-by-Step
Step 1: Ensure the FBX plugin is loaded. Go to Windows → Settings/Preferences → Plug-in Manager. Find fbxmaya.mll and make sure both Loaded and Auto Load are checked. Without this, the FBX import option will not appear in the File menu.
Step 2: Go to File → Import
Step 3: In the file browser, change the file type dropdown from Best Guess to FBX to ensure Maya uses the FBX importer specifically.
Step 4: Before importing, click Import Options (the small box icon next to the Import button). These settings are critical:
Under Geometry:
Unlock Normals: Check this. It allows Maya to recalculate normals correctly rather than being locked to the export values.
Blind Data: Uncheck unless you specifically need it. Blind data adds unnecessary complexity to your mesh nodes.
Under Animation:
Under Units:
Automatic: Leave checked. Maya will attempt to match the unit scale of the FBX file to your scene automatically.
If geometry imports at the wrong scale despite this, manually set the File Units Converted To dropdown to match your Maya scene units (typically centimetres for character work, metres for environments).
Under Cameras and Lights:
Step 5: Click Import
Fixing Materials After FBX Import Into Maya
FBX material imports in Maya create Lambert or Phong materials by default, neither of which is a PBR material. For Arnold renders (the default renderer in Maya), you will need to convert these to aiStandardSurface materials.
Quick material conversion workflow:
Select the imported mesh
Open the Hypershade (Windows → Rendering Editors → Hypershade)
Find the imported materials, they will appear as Lambert or Blinn nodes
Create a new aiStandardSurface material
In the Attribute Editor, manually connect your texture maps:
Albedo/Diffuse PNG → Base Color input
Normal map PNG → connect via a Normal Map utility node → Geometry Normal Camera input (ensure it is set to Tangent Space)
Roughness PNG → Specular Roughness input
Metallic PNG → Metalness input
AO PNG → connect via Multiply node with Base Color
Tip: Set the color space on all non-color texture maps (normal, roughness, metallic, AO) to Raw in the File node attributes. Only the albedo/diffuse texture should be set to sRGB. Getting this wrong produces incorrect material appearance in render.
How to Import OBJ Into Maya

OBJ imports into Maya are generally reliable for static geometry but require manual material setup. The process is simpler than FBX but with clear limitations.
Step-by-Step
Step 1: Ensure the OBJ plugin is loaded. Go to Windows → Settings/Preferences → Plug-in Manager and verify objExport.mll is loaded and set to Auto Load.
Step 2: Go to File → Import
Step 3: Set the file type to OBJ in the dropdown.
Step 4: Import options for OBJ:
Multiple Objects: Check this if your OBJ contains multiple named objects that should remain separate meshes
Force Quads: Leave unchecked unless you specifically need quad-only geometry. This can distort mesh topology.
Step 5: Click Import
What to Expect With OBJ
OBJ imports into Maya with geometry and basic material name assignments from the companion .mtl file. The materials will appear in Hypershade with their names preserved but with no textures connected. You will need to manually create aiStandardSurface materials and connect your texture maps as described in the FBX section above.
OBJ does not support animations, rigs, blend shapes, or scene hierarchy. For static assets where geometry accuracy matters more than material fidelity, OBJ is reliable. For anything more complex, use FBX or GLTF.
How to Import GLTF Into Maya

Native GLTF support in Maya requires a plugin that is not included with Maya by default. The most widely used solution is the Maya GLTF plugin available through Autodesk's developer ecosystem.
Step-by-Step
Step 1: Install the GLTF plugin for your Maya version. Search for Maya GLTF importer and install the version matching your Maya release. Load it via the Plug-in Manager.
Step 2: Once loaded, go to File → Import and select GLTF from the file type dropdown.
Step 3: Navigate to your .glb or .gltf file and import.
What to Expect With GLTF in Maya
GLTF imports into Maya with PBR material data preserved, though the materials will be created as Maya-compatible equivalents rather than perfect one-to-one matches. Check texture connections in Hypershade after import and verify roughness, metallic, and normal maps are correctly assigned.
For studios running Arnold, materials will typically need conversion to aiStandardSurface after import regardless of source format.
How to Import USD Into Maya
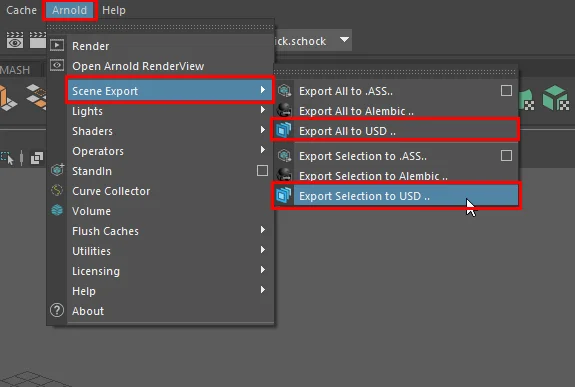
USD support in Maya has improved substantially since Autodesk adopted it as part of their pipeline strategy. Maya 2023 and above has solid USD import support via the built-in USD plugin.
Step-by-Step
Step 1: Go to Windows → Settings/Preferences → Plug-in Manager and verify mayaUsd_Plugin.mll is loaded.
Step 2: Go to File → Import and select USD from the file type dropdown.
Step 3: USD import options:
Import Instances: Check this to preserve USD instance data as Maya instances (important for scenes with repeated geometry, significant performance benefit)
Import Materials: Check this
Use Namespace: Check this to keep USD content organised under a namespace in the Outliner
Step 4: Click Import
USD imports into Maya are generally clean for static and animated assets. Complex USD files with layered overrides and variant sets may require additional setup in the USD Layer Editor.
Namespace Management - Keeping Your Scene Clean
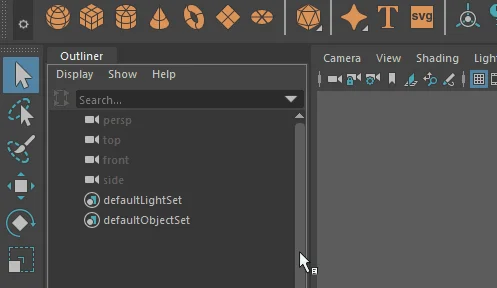
One of the most common Maya-specific complaints about importing assets is the namespace proliferation that clutters the Outliner. Every imported file creates a namespace (assetName:nodeName) that makes scene navigation frustrating at scale.
Managing Namespaces After Import
To view all namespaces: Go to Windows → General Editors → Namespace Editor. This shows every namespace in your scene.
To merge a namespace into the root: In the Namespace Editor, select the namespace you want to dissolve and click Merge with Root. This removes the namespace prefix from all nodes in that namespace. Be careful, if you have two imported assets with identically named nodes, merging into root can cause conflicts.
To rename a namespace: Select it in the Namespace Editor and use the rename function to give it a clear, project-consistent name.
Best practice: Before importing, decide on a namespace naming convention for your project. Using asset type and number (e.g. prop_chair_01, char_hero_01) keeps the Outliner navigable as scenes grow complex.
Scale and Unit Issues - The Complete Fix
Scale mismatch is one of the most frequent Maya import problems, particularly with FBX files. Here is why it happens and how to fix it permanently.
Why Scale Goes Wrong
Maya's default working unit is centimetres. Many 3D tools (including Blender) work in metres. An asset modeled at real-world scale in metres will import into Maya at 1/100th of its intended size, or 100 times too large, depending on whether the exporter handles unit conversion.
The Fix at Import Time
In FBX Import Options, under Units, change File Units Converted To to match your Maya scene. If your Maya scene is in centimetres and the asset was made in metres, set this to Centimetres and check Automatic, Maya will scale the geometry on import.
The Fix After Import
If the asset is already imported at the wrong scale:
Select the root transform node of the imported asset
In the Channel Box, manually set Scale X, Y, Z to the correct value (multiply by 100 to go from metres to centimetres, divide by 100 to go the other way)
Freeze transformations: Modify → Freeze Transformations, this bakes the corrected scale into the geometry so the scale values read as 1.0 going forward
Common Maya Import Problems and Fixes
Cause: Bone orientation in the FBX does not match Maya's joint orientation convention.
Fix: In FBX Import Options, try toggling Automatic under Joint Orientation. If that does not work, the rig may need to be manually reoriented using Maya's joint orient tools. For production character rigs, ask the rigger for a Maya-native .ma file instead of relying on FBX round-tripping.
Problem: Textures appear as solid colours or are missing
Cause: Texture file paths in the imported material are absolute paths that do not exist on your machine.
Fix: Open the Hypershade and inspect each material's File texture nodes. The path field will show the broken path. Click the folder icon and navigate to the correct texture file. Use File → Project → Set to set a proper Maya project structure, this enables relative file paths that travel with your project folder.
Problem: Imported mesh has black faces or dark patches
Cause: Inverted normals on some faces of the imported mesh.
Fix: Select the affected mesh, go to Display → Polygons → Face Normals to visualise normal direction. To fix, select the affected faces in Face Selection mode and go to Mesh Display → Reverse. For a full mesh fix, select all faces and use Mesh Display → Soften Edges combined with Conform normals.
Problem: Multiple objects import as one merged mesh
Cause: The FBX or OBJ was exported without maintaining object separation.
Fix: In Maya's import options, look for Combine Meshes and ensure it is unchecked. If already imported as one mesh, use Mesh → Separate to split the combined mesh back into its component parts (this works best when the sub-meshes do not share vertices).
Problem: Scene playback is slow after importing large assets
Cause: High-polygon assets imported without LODs, or viewport display settings not optimised for scene complexity.
Fix: Set the viewport Renderer to Viewport 2.0 in the panel menu if not already active. Under Renderer → Viewport 2.0 Options, enable Level of Detail if your assets have LOD variants. For very heavy assets, use Display → Object Display → Bounding Box on background assets to reduce viewport load while working.
The Faster Alternative: Native Bridge Plugin
Everything in this guide represents the manual import process. For Maya artists working from a subscription asset library, the manual process has a substantial hidden time cost, format selection, import settings, texture reconnection, material conversion, scale correction, namespace cleanup. On a complex scene with dozens of assets, this overhead adds up to hours.
The Korvix3D Maya Bridge Plugin replaces all of this with a single click. Browse the full Korvix3D asset library from a native panel inside Maya, click any asset, and it lands in your scene correctly scaled, with Arnold-compatible materials connected and textures intact, no manual import steps, no Hypershade diving, no namespace wrestling.
For Maya artists who source assets regularly, the productivity difference between manual importing and a bridge plugin is not marginal. It is transformative.
Install the Korvix3D Maya Plugin → https://www.korvix3d.com/download#maya
Browse the full asset library → https://www.korvix3d.com/assets
Pro Tips for Cleaner Maya Asset Imports
Set up a proper Maya project before importing anything. Go to File → Project → New and create a project with the standard Maya directory structure (scenes, sourceimages, cache, etc.). Place your texture files in the sourceimages folder. Maya uses relative paths within a project, which means textures will stay connected when you move the project to another machine.
Use the Reference Editor to manage referenced assets. Go to File → Reference Editor to view, reload, replace, or remove any referenced assets in your scene. This gives you full control over externally linked content without touching the scene geometry directly.
Import into a clean scene first, then merge. For complex assets, import into a blank Maya scene first. Check everything, scale, materials, rig, normals. Fix any issues. Save this as a clean import file. Then reference or import it into your working scene. This way you are never debugging an import problem inside a complex scene.
Use the Outliner filter aggressively. When working with imported assets, the Outliner can fill with cameras, lights, and helper objects you do not need. Use Display → Show Only filters in the Outliner to isolate geometry, joints, or specific node types.
Freeze transforms immediately after scale correction. Any time you correct scale, rotation, or position after import, immediately freeze transformations (Modify → Freeze Transformations). This prevents transform values from accumulating and causing downstream problems with rigs, constraints, and simulations.
Frequently Asked Questions

Why do my FBX textures go missing when I import into Maya? FBX files store texture paths that are specific to the original artist's file system. Set up a Maya project (File → Project → New) and place your texture files in the sourceimages folder before importing. Maya will then find textures automatically using relative paths.
What is the difference between Import and Reference in Maya? Import merges the asset's data permanently into your scene file. Reference links to an external file, changes to that file update in your scene automatically. For production pipelines, reference is almost always preferred. For personal projects and one-off assets, import is fine.
Why does my FBX character rig deform incorrectly in Maya? FBX round-tripping of rigs between different software is notoriously unreliable. Request a Maya-native .ma or .mb file from the asset creator whenever possible for rigged characters. If you must use FBX, try the Automatic Joint Orientation option in FBX import settings.
How do I convert imported Lambert materials to Arnold aiStandardSurface? In the Hypershade, select the Lambert material, right-click and choose Assign New Material → aiStandardSurface. Then manually reconnect your texture File nodes to the new material's inputs in the Attribute Editor.
Can Maya import GLTF files natively? Not natively in all versions. GLTF import requires a plugin. Autodesk has been expanding USD support as the preferred interchange format, which covers similar use cases to GLTF in production pipelines.
How do I stop imported assets from cluttering my Outliner with namespaces? Go to Windows → General Editors → Namespace Editor and use Merge with Root to dissolve namespaces after import. For ongoing projects, establish a namespace naming convention at project start and apply it consistently.


Autodesk Maya is the backbone of some of the most complex 3D pipelines in the world. Film studios, game studios, VFX houses, and animation companies run their entire production on it. It is the tool that built the worlds of Avatar, The Lord of the Rings, and hundreds of the most technically ambitious games ever made.
But if you have ever tried to import a 3D asset into Maya and had your carefully organised scene turn into an unmanageable mess, namespaces cluttering the Outliner, textures pointing to a folder that does not exist on your machine, geometry importing at a scale that dwarfs your entire scene, or rigs deforming in ways that make no anatomical sense, you know that Maya's power comes with a steep price in import complexity.
This guide covers the right way to import every major 3D file format into Autodesk Maya. Exact settings, common failure modes, step-by-step fixes, and the workflow habits that professional Maya artists use to keep their scenes clean and their pipelines moving.
Maya Import: The Two Methods You Need to Know
Before getting into format-specific workflows, it is worth understanding that Maya has two fundamentally different ways to bring external assets into a scene, and choosing the wrong one for the situation is a primary source of scene-breaking problems.
Method 1 - Import (Merge Into Scene)
File → Import
This brings the asset directly into your current Maya scene. All objects, materials, and nodes from the imported file become part of your active scene. This is the right method when you want to permanently add an asset to a scene and work with it as part of that scene's data.
Risk: Namespace conflicts. When Maya imports a file, it creates a namespace for the imported content (e.g.
chair_01:mesh,chair_01:material). If you import the same asset multiple times or import assets with identical node names, namespace conflicts can clutter your Outliner and cause unexpected behaviour.Method 2 - Reference (Non-Destructive Link)
File → Create Reference
This links an external file to your scene without merging its data. The referenced asset appears in your scene but its data lives in the external file. Changes to the source file propagate to every scene that references it automatically.
Best for: Assets used across multiple shots or scenes in a production pipeline. Character rigs, hero props, and environment assets that may be updated during production should almost always be referenced rather than imported.
Rule of thumb: For production pipelines, use references. For personal projects or one-off assets, use import.
How to Import FBX Into Maya
FBX is the most common format for game assets, character rigs, and assets sourced from other DCC tools. It is also the source of the majority of Maya import problems due to differences in how various applications export FBX data.
Step-by-Step
Step 1: Ensure the FBX plugin is loaded. Go to Windows → Settings/Preferences → Plug-in Manager. Find fbxmaya.mll and make sure both Loaded and Auto Load are checked. Without this, the FBX import option will not appear in the File menu.
Step 2: Go to File → Import
Step 3: In the file browser, change the file type dropdown from Best Guess to FBX to ensure Maya uses the FBX importer specifically.
Step 4: Before importing, click Import Options (the small box icon next to the Import button). These settings are critical:
Under Geometry:
Unlock Normals: Check this. It allows Maya to recalculate normals correctly rather than being locked to the export values.
Blind Data: Uncheck unless you specifically need it. Blind data adds unnecessary complexity to your mesh nodes.
Under Animation:
Import Animation: Check only if the FBX contains animation you need. Unchecking this for static assets keeps your scene clean.
Optical Markers: Uncheck unless working with mocap data.
Under Units:
Automatic: Leave checked. Maya will attempt to match the unit scale of the FBX file to your scene automatically.
If geometry imports at the wrong scale despite this, manually set the File Units Converted To dropdown to match your Maya scene units (typically centimetres for character work, metres for environments).
Under Cameras and Lights:
Uncheck both unless you specifically need the cameras and lights from the FBX. Importing these unnecessarily adds clutter to your scene.
Step 5: Click Import
Fixing Materials After FBX Import Into Maya
FBX material imports in Maya create Lambert or Phong materials by default, neither of which is a PBR material. For Arnold renders (the default renderer in Maya), you will need to convert these to aiStandardSurface materials.
Quick material conversion workflow:
Select the imported mesh
Open the Hypershade (Windows → Rendering Editors → Hypershade)
Find the imported materials, they will appear as Lambert or Blinn nodes
Create a new aiStandardSurface material
In the Attribute Editor, manually connect your texture maps:
Albedo/Diffuse PNG → Base Color input
Normal map PNG → connect via a Normal Map utility node → Geometry Normal Camera input (ensure it is set to Tangent Space)
Roughness PNG → Specular Roughness input
Metallic PNG → Metalness input
AO PNG → connect via Multiply node with Base Color
Tip: Set the color space on all non-color texture maps (normal, roughness, metallic, AO) to Raw in the File node attributes. Only the albedo/diffuse texture should be set to sRGB. Getting this wrong produces incorrect material appearance in render.
How to Import OBJ Into Maya
OBJ imports into Maya are generally reliable for static geometry but require manual material setup. The process is simpler than FBX but with clear limitations.
Step-by-Step
Step 1: Ensure the OBJ plugin is loaded. Go to Windows → Settings/Preferences → Plug-in Manager and verify objExport.mll is loaded and set to Auto Load.
Step 2: Go to File → Import
Step 3: Set the file type to OBJ in the dropdown.
Step 4: Import options for OBJ:
Multiple Objects: Check this if your OBJ contains multiple named objects that should remain separate meshes
Force Quads: Leave unchecked unless you specifically need quad-only geometry. This can distort mesh topology.
Step 5: Click Import
What to Expect With OBJ
OBJ imports into Maya with geometry and basic material name assignments from the companion .mtl file. The materials will appear in Hypershade with their names preserved but with no textures connected. You will need to manually create aiStandardSurface materials and connect your texture maps as described in the FBX section above.
OBJ does not support animations, rigs, blend shapes, or scene hierarchy. For static assets where geometry accuracy matters more than material fidelity, OBJ is reliable. For anything more complex, use FBX or GLTF.
How to Import GLTF Into Maya
Native GLTF support in Maya requires a plugin that is not included with Maya by default. The most widely used solution is the Maya GLTF plugin available through Autodesk's developer ecosystem.
Step-by-Step
Step 1: Install the GLTF plugin for your Maya version. Search for Maya GLTF importer and install the version matching your Maya release. Load it via the Plug-in Manager.
Step 2: Once loaded, go to File → Import and select GLTF from the file type dropdown.
Step 3: Navigate to your .glb or .gltf file and import.
What to Expect With GLTF in Maya
GLTF imports into Maya with PBR material data preserved, though the materials will be created as Maya-compatible equivalents rather than perfect one-to-one matches. Check texture connections in Hypershade after import and verify roughness, metallic, and normal maps are correctly assigned.
For studios running Arnold, materials will typically need conversion to aiStandardSurface after import regardless of source format.
How to Import USD Into Maya
USD support in Maya has improved substantially since Autodesk adopted it as part of their pipeline strategy. Maya 2023 and above has solid USD import support via the built-in USD plugin.
Step-by-Step
Step 1: Go to Windows → Settings/Preferences → Plug-in Manager and verify mayaUsd_Plugin.mll is loaded.
Step 2: Go to File → Import and select USD from the file type dropdown.
Step 3: USD import options:
Import Instances: Check this to preserve USD instance data as Maya instances (important for scenes with repeated geometry, significant performance benefit)
Import Materials: Check this
Use Namespace: Check this to keep USD content organised under a namespace in the Outliner
Step 4: Click Import
USD imports into Maya are generally clean for static and animated assets. Complex USD files with layered overrides and variant sets may require additional setup in the USD Layer Editor.
Namespace Management - Keeping Your Scene Clean
One of the most common Maya-specific complaints about importing assets is the namespace proliferation that clutters the Outliner. Every imported file creates a namespace (
assetName:nodeName) that makes scene navigation frustrating at scale.Managing Namespaces After Import
To view all namespaces: Go to Windows → General Editors → Namespace Editor. This shows every namespace in your scene.
To merge a namespace into the root: In the Namespace Editor, select the namespace you want to dissolve and click Merge with Root. This removes the namespace prefix from all nodes in that namespace. Be careful, if you have two imported assets with identically named nodes, merging into root can cause conflicts.
To rename a namespace: Select it in the Namespace Editor and use the rename function to give it a clear, project-consistent name.
Best practice: Before importing, decide on a namespace naming convention for your project. Using asset type and number (e.g.
prop_chair_01,char_hero_01) keeps the Outliner navigable as scenes grow complex.Scale and Unit Issues - The Complete Fix
Scale mismatch is one of the most frequent Maya import problems, particularly with FBX files. Here is why it happens and how to fix it permanently.
Why Scale Goes Wrong
Maya's default working unit is centimetres. Many 3D tools (including Blender) work in metres. An asset modeled at real-world scale in metres will import into Maya at 1/100th of its intended size, or 100 times too large, depending on whether the exporter handles unit conversion.
The Fix at Import Time
In FBX Import Options, under Units, change File Units Converted To to match your Maya scene. If your Maya scene is in centimetres and the asset was made in metres, set this to Centimetres and check Automatic, Maya will scale the geometry on import.
The Fix After Import
If the asset is already imported at the wrong scale:
Select the root transform node of the imported asset
In the Channel Box, manually set Scale X, Y, Z to the correct value (multiply by 100 to go from metres to centimetres, divide by 100 to go the other way)
Freeze transformations: Modify → Freeze Transformations, this bakes the corrected scale into the geometry so the scale values read as 1.0 going forward
Common Maya Import Problems and Fixes
Problem: Rig deforms incorrectly after FBX import
Cause: Bone orientation in the FBX does not match Maya's joint orientation convention.
Fix: In FBX Import Options, try toggling Automatic under Joint Orientation. If that does not work, the rig may need to be manually reoriented using Maya's joint orient tools. For production character rigs, ask the rigger for a Maya-native .ma file instead of relying on FBX round-tripping.
Problem: Textures appear as solid colours or are missing
Cause: Texture file paths in the imported material are absolute paths that do not exist on your machine.
Fix: Open the Hypershade and inspect each material's File texture nodes. The path field will show the broken path. Click the folder icon and navigate to the correct texture file. Use File → Project → Set to set a proper Maya project structure, this enables relative file paths that travel with your project folder.
Problem: Imported mesh has black faces or dark patches
Cause: Inverted normals on some faces of the imported mesh.
Fix: Select the affected mesh, go to Display → Polygons → Face Normals to visualise normal direction. To fix, select the affected faces in Face Selection mode and go to Mesh Display → Reverse. For a full mesh fix, select all faces and use Mesh Display → Soften Edges combined with Conform normals.
Problem: Multiple objects import as one merged mesh
Cause: The FBX or OBJ was exported without maintaining object separation.
Fix: In Maya's import options, look for Combine Meshes and ensure it is unchecked. If already imported as one mesh, use Mesh → Separate to split the combined mesh back into its component parts (this works best when the sub-meshes do not share vertices).
Problem: Scene playback is slow after importing large assets
Cause: High-polygon assets imported without LODs, or viewport display settings not optimised for scene complexity.
Fix: Set the viewport Renderer to Viewport 2.0 in the panel menu if not already active. Under Renderer → Viewport 2.0 Options, enable Level of Detail if your assets have LOD variants. For very heavy assets, use Display → Object Display → Bounding Box on background assets to reduce viewport load while working.
The Faster Alternative: Native Bridge Plugin
Everything in this guide represents the manual import process. For Maya artists working from a subscription asset library, the manual process has a substantial hidden time cost, format selection, import settings, texture reconnection, material conversion, scale correction, namespace cleanup. On a complex scene with dozens of assets, this overhead adds up to hours.
The Korvix3D Maya Bridge Plugin replaces all of this with a single click. Browse the full Korvix3D asset library from a native panel inside Maya, click any asset, and it lands in your scene correctly scaled, with Arnold-compatible materials connected and textures intact, no manual import steps, no Hypershade diving, no namespace wrestling.
For Maya artists who source assets regularly, the productivity difference between manual importing and a bridge plugin is not marginal. It is transformative.
Install the Korvix3D Maya Plugin → https://www.korvix3d.com/download#maya
Browse the full asset library → https://www.korvix3d.com/assets
Pro Tips for Cleaner Maya Asset Imports
Set up a proper Maya project before importing anything. Go to File → Project → New and create a project with the standard Maya directory structure (scenes, sourceimages, cache, etc.). Place your texture files in the sourceimages folder. Maya uses relative paths within a project, which means textures will stay connected when you move the project to another machine.
Use the Reference Editor to manage referenced assets. Go to File → Reference Editor to view, reload, replace, or remove any referenced assets in your scene. This gives you full control over externally linked content without touching the scene geometry directly.
Import into a clean scene first, then merge. For complex assets, import into a blank Maya scene first. Check everything, scale, materials, rig, normals. Fix any issues. Save this as a clean import file. Then reference or import it into your working scene. This way you are never debugging an import problem inside a complex scene.
Use the Outliner filter aggressively. When working with imported assets, the Outliner can fill with cameras, lights, and helper objects you do not need. Use Display → Show Only filters in the Outliner to isolate geometry, joints, or specific node types.
Freeze transforms immediately after scale correction. Any time you correct scale, rotation, or position after import, immediately freeze transformations (Modify → Freeze Transformations). This prevents transform values from accumulating and causing downstream problems with rigs, constraints, and simulations.
Frequently Asked Questions
Why do my FBX textures go missing when I import into Maya? FBX files store texture paths that are specific to the original artist's file system. Set up a Maya project (File → Project → New) and place your texture files in the sourceimages folder before importing. Maya will then find textures automatically using relative paths.
What is the difference between Import and Reference in Maya? Import merges the asset's data permanently into your scene file. Reference links to an external file, changes to that file update in your scene automatically. For production pipelines, reference is almost always preferred. For personal projects and one-off assets, import is fine.
Why does my FBX character rig deform incorrectly in Maya? FBX round-tripping of rigs between different software is notoriously unreliable. Request a Maya-native .ma or .mb file from the asset creator whenever possible for rigged characters. If you must use FBX, try the Automatic Joint Orientation option in FBX import settings.
How do I convert imported Lambert materials to Arnold aiStandardSurface? In the Hypershade, select the Lambert material, right-click and choose Assign New Material → aiStandardSurface. Then manually reconnect your texture File nodes to the new material's inputs in the Attribute Editor.
Can Maya import GLTF files natively? Not natively in all versions. GLTF import requires a plugin. Autodesk has been expanding USD support as the preferred interchange format, which covers similar use cases to GLTF in production pipelines.
How do I stop imported assets from cluttering my Outliner with namespaces? Go to Windows → General Editors → Namespace Editor and use Merge with Root to dissolve namespaces after import. For ongoing projects, establish a namespace naming convention at project start and apply it consistently.