If you have ever hit Render and waited ten minutes only to realise the shadows look off, the glare is too strong, or the reflections are too bright, you already know the pain of single-pass rendering. You fix one thing and break another. Multipass rendering changes that completely.
Instead of baking your entire scene into a single flat image, multipass rendering breaks the final output into individual layers (e.g., diffuse colour, specularity, shadows, ambient occlusion, depth, motion blur and more. Each layer is a separate image you can adjust non-destructively in a compositor like Blender's own Node Editor or Adobe After Effects. The result? Faster iteration, far more creative control, and a professional post-production pipeline that studios rely on for good reason.
This guide walks you through everything: the theory, the setup inside Blender, the most useful passes and how to composite them back together. Let's get into it.
1. Why Multipass Rendering Exists
Rendering is expensive. Re-rendering is more expensive. Multipass rendering was born out of a very practical need in VFX and animation studios: teams need to make fine-tuned changes to lighting, colour grading and effects without re-firing a render farm for hours.
Think of it like recording a song. A single-pass render is a live recording, every instrument mixed together, impossible to change after the fact. Multipass is like recording each instrument on its own track. After the session, you can boost the drums, lower the guitar, add reverb to just the vocals, without touching anything else.
For solo artists and small studios, the benefit is just as real. Let's say your client wants the shadows darker. With a single pass you re-render the whole scene. With passes, you pull up the shadow pass in the compositor, multiply it slightly, and you're done in seconds.
💡 Key Benefit Multipass rendering decouples lighting, shading and effects into adjustable layers, giving you full post-production control without re-rendering. |
2. Understanding the Core Render Passes
Blender organises passes into several categories inside the View Layer Properties panel. Here are the ones you'll actually use:
2.1 Combined Pass
This is Blender's default output - all light contributions added together into one image. It's the finished composite you'd normally save as your render. When you enable other passes, you're extracting individual contributions from this combined total.
2.2 Diffuse Passes (Color, Direct, Indirect)
Diffuse passes capture the base colour and how light falls on surfaces. The three sub-passes work together:
Diffuse Color - the raw material colour with no lighting
Diffuse Direct - light that hits a surface from a light source directly
Diffuse Indirect - bounced or scattered light (global illumination)
2.3 Specular Passes
Specular passes capture reflective highlights, i.e., the bright spots where light bounces off shiny surfaces directly toward the camera. Isolating this pass lets you dial in glossy reflections without affecting the underlying diffuse look.
2.4 Shadow Pass
A dedicated grayscale pass containing shadow information. Because it's separate, you can deepen, soften or tint shadows in compositing freely. This single pass is responsible for a huge chunk of realism in post-production grading.
2.5 Ambient Occlusion (AO) Pass
AO darkens crevices, corners and tight spaces where indirect light struggles to reach. It's a cheap, powerful way to add contact shadow detail and ground objects in a scene. Compositing AO as a multiply layer on top of your diffuse is a classic technique for adding depth.
2.6 Depth (Z) Pass
The Z pass stores distance from the camera as a grayscale value. Close objects are bright; far ones are dark (or vice versa depending on your setup). It's used for depth-of-field, fog effects and depth-based colour grading in post.
2.7 Mist Pass
Similar to Z but designed specifically for adding atmospheric haze. You can use it as a mask to control exactly how much fog affects different distances. Blender has a dedicated Mist panel inside World Properties.
2.8 Normal Pass
Stores surface normals as RGB colour values. Most useful for technical workflows, e.g., like relighting in compositing using normal data instead of re-rendering.
2.9 Cryptomatte
One of the most powerful passes. Cryptomatte automatically generates per-object, per-material or per-asset masks. Instead of manually painting masks, Blender generates them for every element in the scene. In the compositor you click an object to create a perfect, anti-aliased mask for it. Invaluable for colour grading individual objects.
✅ Pro Tip: Enable Cryptomatte for every serious project. It costs almost no render time but saves enormous compositing effort. |
3. Setting Up Render Passes in Blender
Here's the step-by-step process to enable passes and export them for compositing.
Step 1 - Switch to Cycles (or EEVEE)
Most passes are available in both renderers, though Cycles has more advanced light path passes. Go to Properties > Render Properties and select your engine. For production-quality multipass work, Cycles is the standard choice.
Step 2 - Enable Passes in View Layer Properties
In the Properties panel, click the View Layer Properties tab (the stack of pages icon).
Scroll down to the Passes section. You'll see collapsible groups: Data, Light, Effects, Cycles.
Enable the passes you need by ticking the checkboxes. Hover over each to see a tooltip explaining it.
Common starter set: Combined, Diffuse Color, Diffuse Direct, Diffuse Indirect, Specular Direct, Shadow, AO, Z, Cryptomatte.
Step 3 - Set Up the Output Format
For multipass work, save renders as OpenEXR Multilayer. This single file format stores every pass in one file, preserving full 32-bit float precision.
Go to Properties > Output Properties.
Under Output, set the format to OpenEXR MultiLayer.
Set the Codec to DWAA or ZIP for a good balance of quality and file size.
Choose your output folder and filename.
💡 Why OpenEXR? OpenEXR MultiLayer is the industry standard for VFX and animation pipelines. It preserves HDR data and all passes in a single file with no quality loss. JPEG and PNG cannot store multipass data or HDR values. |
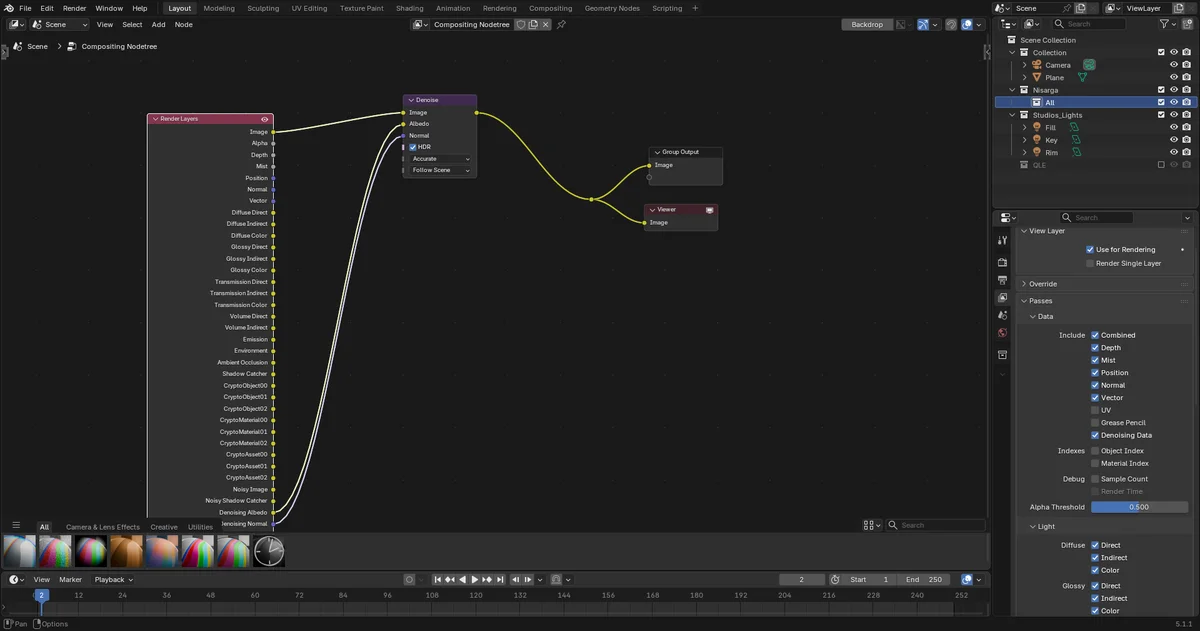
Step 4 - Enable Compositing Nodes
Switch to the Compositing workspace (or press Shift+F3 in any window and change it to Compositor).
Tick Use Nodes at the top of the compositor.
A default Render Layers node connected to a Composite node will appear.
Click the Render Layers node to see all your enabled passes as output sockets.
4. Compositing Passes Back Together
Now the creative part. You can either composite in Blender's own Node Compositor or export the EXR and work in DaVinci Resolve, Nuke, After Effects or Fusion. Blender's built-in compositor is excellent for most tasks.
4.1 The Basic Diffuse Reconstruction
The most fundamental operation in multipass compositing is rebuilding the diffuse look manually so you can control each component:
Plug Diffuse Color into a MixRGB node set to Multiply, with Diffuse Direct as the second input.
Add another MixRGB (Add mode) combining the result with Diffuse Indirect multiplied by Diffuse Color.
This gives you a physically accurate diffuse layer you can grade independently.
It sounds complex, but once you build the node tree once, save it as a Node Group or an asset. You'll reuse it constantly.
4.2 Adding Ambient Occlusion
A classic technique that adds enormous depth with one node. Connect the AO pass into a MixRGB node set to Multiply with a factor of around 0.5 - 0.8, placed over your beauty layer. This darkens contact areas naturally, making objects feel grounded rather than floating.
4.3 Working With the Shadow Pass
To make shadows adjustable without affecting the rest of the scene:
Connect the Shadow pass into a Multiply node over your Combined or Diffuse layer.
Use a ColorRamp before the multiply to shift shadow colour, e.g., warm brown shadows read as cinematic, cool blue shadows read as outdoor/daylight.
Reduce the Multiply factor to soften shadows, or boost it for harsh, dramatic looks.
4.4 Cryptomatte Masking
Using Cryptomatte in the compositor is one of the slickest workflows in Blender:
Add a Cryptomatte node from Add > Matte > Cryptomatte.
Connect your Render Layers' CryptoObject or CryptoMaterial output to it.
With your cursor over the rendered result in the compositor backdrop, hold the eyedropper icon in the Cryptomatte node and click on the object you want to isolate.
The output Matte socket gives you a perfect mask of just that object, no manual painting required.
💡 Real World Use Case
In a product visualisation render, use Cryptomatte to select just the product's metallic label, boost its saturation and tweak its hue in compositing, without touching the rest of the scene at all. |
4.5 Depth-Based Effects
The Z pass unlocks two major effects:
Depth of Field, i.e., use the Z pass to drive a Defocus node or Blur node to simulate camera DOF without needing Blender's native DOF (which re-renders). You have full control in post.
Atmospheric Depth, i.e., use the Mist pass as a mask to blend in a fog colour over distant objects, controlled entirely by a ColorRamp and Mix node.
5. Render Pass Workflow Tips
5.1 Only Enable What You'll Use
Each pass adds to memory usage and slightly to render time. Don't enable all passes by default. Build a base preset of passes you use in every project (Combined, Diffuse, Shadow, AO, Cryptomatte, Z) and only add more when a specific project requires it.
5.2 Use Denoise per Pass, Not Just Combined
Blender's OIDN (Intel Open Image Denoise) can denoise individual passes, not just the final combined. Enable Denoise under View Layer passes for cleaner individual pass data, especially important for the diffuse indirect pass which tends to be the noisiest.
5.3 Batch Render Light Groups Separately
From Blender 3.2+, the Light Groups feature lets you assign lights to named groups and render them as separate passes. This means in compositing you can independently control every light source, e.g., adjust the softbox separately from the rim light, separately from the HDRI. For product visualization and architectural work, this is transformative.
✅ Pro Tip: Name your Light Groups clearly (key_light, fill_light, background_light) before rendering. You will thank yourself in compositing. |
5.4 Multi-Layer EXR Naming Conventions
When saving OpenEXR MultiLayer files, Blender automatically names layers by view layer name and pass name. Use descriptive view layer names (hero_object, background_env, fx_particles) so your EXR layers are easy to identify when imported into an external compositor.
5.5 Composite in 32-bit Float
Always ensure your compositor is operating in 32-bit full float precision when working with EXR passes. In Blender, this is the default when you load an EXR. In After Effects, set your composition to 32-bit in the Project Settings colour depth. Compositing in 8-bit will crush your HDR data and introduce banding.
6. Common Multipass Mistakes to Avoid
Saving as JPEG or PNG instead of EXR. These formats clip HDR values above 1.0 and discard most passes. Always use OpenEXR MultiLayer for multipass exports.
Compositing without the Viewer node. Add a Viewer node at each stage of your composite to monitor what's happening at each step. Without it, you're compositing blind.
Ignoring the Film > Transparent option. If you plan to composite renders over different backgrounds, enable Transparent under Render Properties > Film. This stores the alpha channel properly instead of a solid background colour.
Forgetting to convert Linear EXR to display colour space. EXR files store linear light data. When you load them, you need to apply your display transform (sRGB or Filmic in Blender) or everything will look washed out and overexposed.
Over-complicating the node tree. A common beginner mistake is connecting every pass and hoping it improves the result. Build the composite incrementally. Add one pass at a time and evaluate its contribution.
7. Real-World Multipass Workflow: Product Viz Example
To tie it all together, here is a real-world scenario: you are rendering a product shot of a perfume bottle for a client who will review it and request changes.
The Render Setup
Enable passes: Combined, Diffuse Color, Diffuse Direct, Diffuse Indirect, Specular Direct, Shadow, Reflection Direct, AO, Z, Cryptomatte Object, Cryptomatte Material
Add three Light Groups: key, fill, rim
Save as OpenEXR MultiLayer
Render once
Compositing Stage
Load EXR into compositor. Rebuild diffuse layer from Diffuse Color + Direct + Indirect.
Multiply AO over diffuse at 0.6 factor for grounded contact shadows.
Add Specular Direct back in via Add mode.
Use Cryptomatte to isolate the bottle glass, boost its Transmission slightly for a more luxurious look.
Use the rim Light Group pass to add a subtle pink tint to rim light without re-rendering.
Adjust shadow darkness using Shadow pass multiply, client wants darker grounding shadows.
Use Z pass in a Defocus node to add a subtle depth blur to the background.
The Client Requests a Change
The client wants the bottle label colour shifted from gold to silver. Without multipass you would re-texture and re-render. With multipass and Cryptomatte, you select the label material in the Cryptomatte node, pipe the mask into a HueSaturation node, desaturate and shift lightness slightly. Done in under two minutes.
💡 The Big Picture This workflow (render once, adjust forever) is the reason multipass rendering is standard in every professional 3D pipeline. The upfront setup investment pays off every single time a client requests a change. |
Wrapping Up
Multipass rendering feels like extra work the first time you set it up. But the moment you make your first post-render adjustment in under a minute, an adjustment that would have taken a 20-minute re-render otherwise, it clicks. You will never go back to single-pass workflows for serious projects.
Start simple: enable the Combined, Diffuse, Shadow, AO and Cryptomatte passes on your next project. Learn the node tree. Once that's comfortable, add Light Groups and depth passes. Each layer you add gives you another dimension of creative control.
Multipass rendering is not just a technical workflow. It is a creative superpower. Use it.
Quick Reference: Essential Render Passes
Pass Name | What It Contains | Use in Compositing |
|---|
Diffuse Color | Base material color | Color grading, re-lighting |
Diffuse Direct | Direct light on surfaces | Adjust direct lighting |
Diffuse Indirect | Bounced/scattered light | Control GI separately |
Specular Direct | Glossy highlights | Dial in shine/reflections |
Shadow | Shadow intensity | Darken/soften/tint shadows |
Ambient Occlusion | Contact shadow detail | Add depth and grounding |
Z / Depth | Camera distance map | DOF, fog, depth grade |
Mist | Atmospheric depth mask | Fog and haze effects |
Cryptomatte | Per-object/material masks | Isolate and grade objects |
Emit | Self-emission / bloom source | Control glows separately |
Light Group | Per-light contribution | Adjust individual lights |


If you have ever hit Render and waited ten minutes only to realise the shadows look off, the glare is too strong, or the reflections are too bright, you already know the pain of single-pass rendering. You fix one thing and break another. Multipass rendering changes that completely.
Instead of baking your entire scene into a single flat image, multipass rendering breaks the final output into individual layers (e.g., diffuse colour, specularity, shadows, ambient occlusion, depth, motion blur and more. Each layer is a separate image you can adjust non-destructively in a compositor like Blender's own Node Editor or Adobe After Effects. The result? Faster iteration, far more creative control, and a professional post-production pipeline that studios rely on for good reason.
This guide walks you through everything: the theory, the setup inside Blender, the most useful passes and how to composite them back together. Let's get into it.
1. Why Multipass Rendering Exists
Rendering is expensive. Re-rendering is more expensive. Multipass rendering was born out of a very practical need in VFX and animation studios: teams need to make fine-tuned changes to lighting, colour grading and effects without re-firing a render farm for hours.
Think of it like recording a song. A single-pass render is a live recording, every instrument mixed together, impossible to change after the fact. Multipass is like recording each instrument on its own track. After the session, you can boost the drums, lower the guitar, add reverb to just the vocals, without touching anything else.
For solo artists and small studios, the benefit is just as real. Let's say your client wants the shadows darker. With a single pass you re-render the whole scene. With passes, you pull up the shadow pass in the compositor, multiply it slightly, and you're done in seconds.
💡 Key Benefit
Multipass rendering decouples lighting, shading and effects into adjustable layers, giving you full post-production control without re-rendering.
2. Understanding the Core Render Passes
Blender organises passes into several categories inside the View Layer Properties panel. Here are the ones you'll actually use:
2.1 Combined Pass
This is Blender's default output - all light contributions added together into one image. It's the finished composite you'd normally save as your render. When you enable other passes, you're extracting individual contributions from this combined total.
2.2 Diffuse Passes (Color, Direct, Indirect)
Diffuse passes capture the base colour and how light falls on surfaces. The three sub-passes work together:
Diffuse Color - the raw material colour with no lighting
Diffuse Direct - light that hits a surface from a light source directly
Diffuse Indirect - bounced or scattered light (global illumination)
2.3 Specular Passes
Specular passes capture reflective highlights, i.e., the bright spots where light bounces off shiny surfaces directly toward the camera. Isolating this pass lets you dial in glossy reflections without affecting the underlying diffuse look.
2.4 Shadow Pass
A dedicated grayscale pass containing shadow information. Because it's separate, you can deepen, soften or tint shadows in compositing freely. This single pass is responsible for a huge chunk of realism in post-production grading.
2.5 Ambient Occlusion (AO) Pass
AO darkens crevices, corners and tight spaces where indirect light struggles to reach. It's a cheap, powerful way to add contact shadow detail and ground objects in a scene. Compositing AO as a multiply layer on top of your diffuse is a classic technique for adding depth.
2.6 Depth (Z) Pass
The Z pass stores distance from the camera as a grayscale value. Close objects are bright; far ones are dark (or vice versa depending on your setup). It's used for depth-of-field, fog effects and depth-based colour grading in post.
2.7 Mist Pass
Similar to Z but designed specifically for adding atmospheric haze. You can use it as a mask to control exactly how much fog affects different distances. Blender has a dedicated Mist panel inside World Properties.
2.8 Normal Pass
Stores surface normals as RGB colour values. Most useful for technical workflows, e.g., like relighting in compositing using normal data instead of re-rendering.
2.9 Cryptomatte
One of the most powerful passes. Cryptomatte automatically generates per-object, per-material or per-asset masks. Instead of manually painting masks, Blender generates them for every element in the scene. In the compositor you click an object to create a perfect, anti-aliased mask for it. Invaluable for colour grading individual objects.
✅ Pro Tip: Enable Cryptomatte for every serious project. It costs almost no render time but saves enormous compositing effort.
3. Setting Up Render Passes in Blender
Here's the step-by-step process to enable passes and export them for compositing.
Step 1 - Switch to Cycles (or EEVEE)
Most passes are available in both renderers, though Cycles has more advanced light path passes. Go to Properties > Render Properties and select your engine. For production-quality multipass work, Cycles is the standard choice.
Step 2 - Enable Passes in View Layer Properties
In the Properties panel, click the View Layer Properties tab (the stack of pages icon).
Scroll down to the Passes section. You'll see collapsible groups: Data, Light, Effects, Cycles.
Enable the passes you need by ticking the checkboxes. Hover over each to see a tooltip explaining it.
Common starter set: Combined, Diffuse Color, Diffuse Direct, Diffuse Indirect, Specular Direct, Shadow, AO, Z, Cryptomatte.
Step 3 - Set Up the Output Format
For multipass work, save renders as OpenEXR Multilayer. This single file format stores every pass in one file, preserving full 32-bit float precision.
Go to Properties > Output Properties.
Under Output, set the format to OpenEXR MultiLayer.
Set the Codec to DWAA or ZIP for a good balance of quality and file size.
Choose your output folder and filename.
💡 Why OpenEXR?
OpenEXR MultiLayer is the industry standard for VFX and animation pipelines. It preserves HDR data and all passes in a single file with no quality loss. JPEG and PNG cannot store multipass data or HDR values.
Step 4 - Enable Compositing Nodes
Switch to the Compositing workspace (or press Shift+F3 in any window and change it to Compositor).
Tick Use Nodes at the top of the compositor.
A default Render Layers node connected to a Composite node will appear.
Click the Render Layers node to see all your enabled passes as output sockets.
4. Compositing Passes Back Together
Now the creative part. You can either composite in Blender's own Node Compositor or export the EXR and work in DaVinci Resolve, Nuke, After Effects or Fusion. Blender's built-in compositor is excellent for most tasks.
4.1 The Basic Diffuse Reconstruction
The most fundamental operation in multipass compositing is rebuilding the diffuse look manually so you can control each component:
Plug Diffuse Color into a MixRGB node set to Multiply, with Diffuse Direct as the second input.
Add another MixRGB (Add mode) combining the result with Diffuse Indirect multiplied by Diffuse Color.
This gives you a physically accurate diffuse layer you can grade independently.
It sounds complex, but once you build the node tree once, save it as a Node Group or an asset. You'll reuse it constantly.
4.2 Adding Ambient Occlusion
A classic technique that adds enormous depth with one node. Connect the AO pass into a MixRGB node set to Multiply with a factor of around 0.5 - 0.8, placed over your beauty layer. This darkens contact areas naturally, making objects feel grounded rather than floating.
4.3 Working With the Shadow Pass
To make shadows adjustable without affecting the rest of the scene:
Connect the Shadow pass into a Multiply node over your Combined or Diffuse layer.
Use a ColorRamp before the multiply to shift shadow colour, e.g., warm brown shadows read as cinematic, cool blue shadows read as outdoor/daylight.
Reduce the Multiply factor to soften shadows, or boost it for harsh, dramatic looks.
4.4 Cryptomatte Masking
Using Cryptomatte in the compositor is one of the slickest workflows in Blender:
Add a Cryptomatte node from Add > Matte > Cryptomatte.
Connect your Render Layers' CryptoObject or CryptoMaterial output to it.
With your cursor over the rendered result in the compositor backdrop, hold the eyedropper icon in the Cryptomatte node and click on the object you want to isolate.
The output Matte socket gives you a perfect mask of just that object, no manual painting required.
Feed this mask into a ColorBalance or HueSaturation node to grade that object independently.
💡 Real World Use Case
In a product visualisation render, use Cryptomatte to select just the product's metallic label, boost its saturation and tweak its hue in compositing, without touching the rest of the scene at all.
4.5 Depth-Based Effects
The Z pass unlocks two major effects:
Depth of Field, i.e., use the Z pass to drive a Defocus node or Blur node to simulate camera DOF without needing Blender's native DOF (which re-renders). You have full control in post.
Atmospheric Depth, i.e., use the Mist pass as a mask to blend in a fog colour over distant objects, controlled entirely by a ColorRamp and Mix node.
5. Render Pass Workflow Tips
5.1 Only Enable What You'll Use
Each pass adds to memory usage and slightly to render time. Don't enable all passes by default. Build a base preset of passes you use in every project (Combined, Diffuse, Shadow, AO, Cryptomatte, Z) and only add more when a specific project requires it.
5.2 Use Denoise per Pass, Not Just Combined
Blender's OIDN (Intel Open Image Denoise) can denoise individual passes, not just the final combined. Enable Denoise under View Layer passes for cleaner individual pass data, especially important for the diffuse indirect pass which tends to be the noisiest.
5.3 Batch Render Light Groups Separately
From Blender 3.2+, the Light Groups feature lets you assign lights to named groups and render them as separate passes. This means in compositing you can independently control every light source, e.g., adjust the softbox separately from the rim light, separately from the HDRI. For product visualization and architectural work, this is transformative.
✅ Pro Tip: Name your Light Groups clearly (key_light, fill_light, background_light) before rendering. You will thank yourself in compositing.
5.4 Multi-Layer EXR Naming Conventions
When saving OpenEXR MultiLayer files, Blender automatically names layers by view layer name and pass name. Use descriptive view layer names (hero_object, background_env, fx_particles) so your EXR layers are easy to identify when imported into an external compositor.
5.5 Composite in 32-bit Float
Always ensure your compositor is operating in 32-bit full float precision when working with EXR passes. In Blender, this is the default when you load an EXR. In After Effects, set your composition to 32-bit in the Project Settings colour depth. Compositing in 8-bit will crush your HDR data and introduce banding.
6. Common Multipass Mistakes to Avoid
Saving as JPEG or PNG instead of EXR. These formats clip HDR values above 1.0 and discard most passes. Always use OpenEXR MultiLayer for multipass exports.
Compositing without the Viewer node. Add a Viewer node at each stage of your composite to monitor what's happening at each step. Without it, you're compositing blind.
Ignoring the Film > Transparent option. If you plan to composite renders over different backgrounds, enable Transparent under Render Properties > Film. This stores the alpha channel properly instead of a solid background colour.
Forgetting to convert Linear EXR to display colour space. EXR files store linear light data. When you load them, you need to apply your display transform (sRGB or Filmic in Blender) or everything will look washed out and overexposed.
Over-complicating the node tree. A common beginner mistake is connecting every pass and hoping it improves the result. Build the composite incrementally. Add one pass at a time and evaluate its contribution.
7. Real-World Multipass Workflow: Product Viz Example
To tie it all together, here is a real-world scenario: you are rendering a product shot of a perfume bottle for a client who will review it and request changes.
The Render Setup
Enable passes: Combined, Diffuse Color, Diffuse Direct, Diffuse Indirect, Specular Direct, Shadow, Reflection Direct, AO, Z, Cryptomatte Object, Cryptomatte Material
Add three Light Groups: key, fill, rim
Save as OpenEXR MultiLayer
Render once
Compositing Stage
Load EXR into compositor. Rebuild diffuse layer from Diffuse Color + Direct + Indirect.
Multiply AO over diffuse at 0.6 factor for grounded contact shadows.
Add Specular Direct back in via Add mode.
Use Cryptomatte to isolate the bottle glass, boost its Transmission slightly for a more luxurious look.
Use the rim Light Group pass to add a subtle pink tint to rim light without re-rendering.
Adjust shadow darkness using Shadow pass multiply, client wants darker grounding shadows.
Use Z pass in a Defocus node to add a subtle depth blur to the background.
The Client Requests a Change
The client wants the bottle label colour shifted from gold to silver. Without multipass you would re-texture and re-render. With multipass and Cryptomatte, you select the label material in the Cryptomatte node, pipe the mask into a HueSaturation node, desaturate and shift lightness slightly. Done in under two minutes.
💡 The Big Picture
This workflow (render once, adjust forever) is the reason multipass rendering is standard in every professional 3D pipeline. The upfront setup investment pays off every single time a client requests a change.
Wrapping Up
Multipass rendering feels like extra work the first time you set it up. But the moment you make your first post-render adjustment in under a minute, an adjustment that would have taken a 20-minute re-render otherwise, it clicks. You will never go back to single-pass workflows for serious projects.
Start simple: enable the Combined, Diffuse, Shadow, AO and Cryptomatte passes on your next project. Learn the node tree. Once that's comfortable, add Light Groups and depth passes. Each layer you add gives you another dimension of creative control.
Multipass rendering is not just a technical workflow. It is a creative superpower. Use it.
Quick Reference: Essential Render Passes
Pass Name
What It Contains
Use in Compositing
Diffuse Color
Base material color
Color grading, re-lighting
Diffuse Direct
Direct light on surfaces
Adjust direct lighting
Diffuse Indirect
Bounced/scattered light
Control GI separately
Specular Direct
Glossy highlights
Dial in shine/reflections
Shadow
Shadow intensity
Darken/soften/tint shadows
Ambient Occlusion
Contact shadow detail
Add depth and grounding
Z / Depth
Camera distance map
DOF, fog, depth grade
Mist
Atmospheric depth mask
Fog and haze effects
Cryptomatte
Per-object/material masks
Isolate and grade objects
Emit
Self-emission / bloom source
Control glows separately
Light Group
Per-light contribution
Adjust individual lights