UV Unwrapping in Blender: 7 Tips to Never Get Messy Textures Again
UV unwrapping can make or break your textures, get it wrong and even the best 4K maps look stretched and broken. Here are 7 practical Blender tips to clean up your UVs, eliminate distortion, and get pixel-perfect results every single time.
You spend hours modeling a beautiful 3D asset. You apply your texture. You hit render. And then, stretched pixels, blurry patches, and seams running right across the most visible part of your model. Sound familiar?
UV unwrapping is the step most beginners either skip, rush through, or quietly dread. It's that invisible layer of work between modeling and texturing that determines whether your final render looks polished and professional or like something went badly wrong. And yet, almost no beginner tutorial gives it the attention it deserves.
In this guide we're fixing that. Here are 7 practical, actionable tips that will transform how you approach UV unwrapping in Blender, and save you from the messy texture nightmares that plague so many 3D artists early in their journey.
💡 Quick refresher: What even is UV unwrapping?
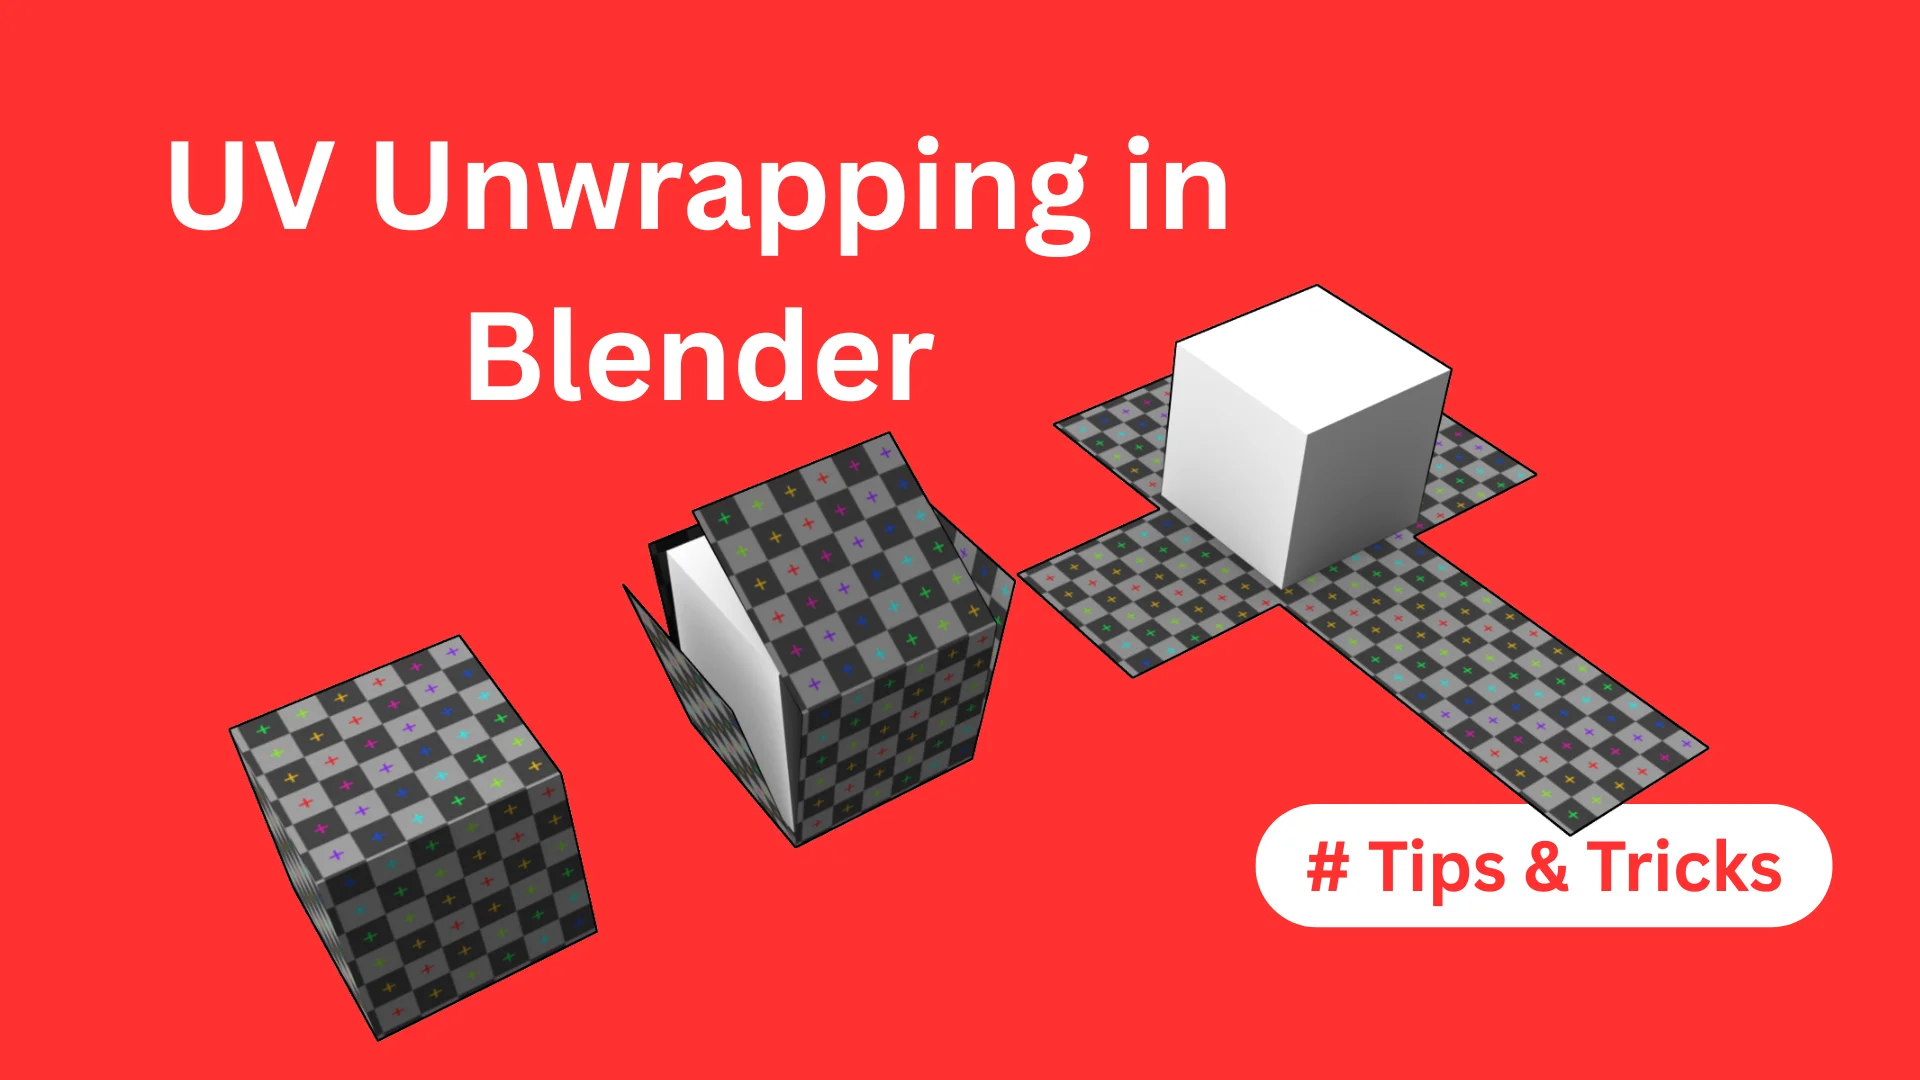
Every 3D model is made of faces arranged in 3D space. UV unwrapping is the process of "unfolding" those faces flat, like cutting open a cardboard box, so a 2D texture image can be applied to them accurately. The U and V refer to the horizontal and vertical axes of that flat 2D space (since X, Y and Z are already used for 3D). Bad UVs = bad textures, no matter how good your texture image is.
TIP 01 - Always Check Your Scale Before Unwrapping
This is the single most common UV mistake beginners make, and it causes more wasted hours than almost anything else in Blender. Before you unwrap a single face, you must apply your object's scale.
Here's why it matters: when you scale an object in Object Mode without applying the transform, Blender remembers the original unscaled geometry internally. Your UV unwrap then tries to work with that original data, producing wildly inconsistent UV island sizes, textures that look huge on one face and tiny on another, even when you want them uniform.
The fix : two steps, ten seconds:
Select your object in Object Mode
Press Ctrl + A and choose "Apply Scale" (or "All Transforms" to be safe)
Do this before unwrapping every single object, every single time. Build it into your muscle memory. It costs nothing and saves enormous frustration later.
Pro tip: If you're working with multiple objects that need consistent texture scale, like a room full of furniture, applying scale to all of them before unwrapping ensures your textures tile uniformly across every surface.
TIP 02 - Place Seams Deliberately - Hide Them in Plain Sight
A seam is the cut line you make in your mesh that tells Blender where to "cut" the geometry when unfolding it flat. Every unwrap has seams, the goal isn't to eliminate them, it's to hide them somewhere they'll never be noticed.
Think of it like a tailor cutting fabric. A skilled tailor places the seam allowance along the inside of the collar, the underside of the arm, the back of the knee, somewhere hidden and structurally logical. UV seams work exactly the same way.
Where to place seams for common objects:
Characters & organic models - along the back of the neck, under the arms, inner legs, bottom of shoes
Hard surface objects (furniture, props) - along the underside, back edges, or inside corners that face away from camera
Cylindrical shapes (pillars, pipes, bottles) - one vertical seam running down the most hidden side
Architectural elements - along corners and edges that are typically in shadow
To mark a seam in Blender: select the edges you want to cut in Edit Mode, then press Ctrl + E and choose "Mark Seam." The edges turn red to confirm. Once all seams are placed, select all faces with A and press U, then "Unwrap."
Key insight: Seams in low-traffic areas of your model (areas rarely seen by the camera) are invisible in practice. Seams on prominent flat surfaces will always show as texture discontinuities. Plan your seam placement before you start cutting.
TIP 03 - Use Smart UV Project for Hard Surface Models
Blender's standard "Unwrap" algorithm is excellent for organic shapes with carefully placed seams. But for hard surface models, furniture, buildings, mechanical props, architectural elements, there's a faster, often better option: Smart UV Project.
Smart UV Project automatically analyzes the angles between faces and creates UV islands based on those angles, without you needing to place a single seam manually. For objects with lots of flat surfaces at 90-degree angles, which describes most furniture, room props, and architectural assets, it produces clean, well-separated UV islands almost instantly.
How to use it:
In Edit Mode, select all faces with A
Press U to open the UV menu
Choose "Smart UV Project"
In the operator panel (bottom left), adjust the Angle Limit - 66 degrees works well for most hard surface models
Hit OK and check your UV editor - islands should be clean and separated
Smart UV Project won't work well for organic, curved, or cylindrical models, use manual seams for those. But for 80% of architectural props, furniture, and mechanical assets, it's a genuine time-saver.
Korvix3D tip: When working with free 3D models downloaded from Korvix3D, always check the existing UV map before retexturing. Many models ship with clean UVs already, you may not need to unwrap at all.
TIP 04 - Pack Your UV Islands Efficiently - Don't Waste Texture Space
Once your UV islands are laid out, they need to fit cleanly within the UV square (the 0-1 UV space). How you arrange them determines how much of your texture resolution is actually being used. Poor packing = wasted texture space = lower quality textures on your model at the same resolution.
Imagine printing a label for a package but leaving half the label paper blank. You're using the same amount of material but getting half the information on it. UV packing works the same way, you want every part of your texture image to be doing useful work.
Blender's built-in packing tools:
Select all islands with A in the UV Editor, then go to UV > Pack Islands - Blender will automatically rearrange your islands to fill the space efficiently
Adjust the Margin value in the operator panel - 0.001 to 0.003 works well for most models, leaving a small gap between islands to prevent texture bleeding
For models that need uniform texel density (same texture resolution across all surfaces), use the "Average Island Scale" option before packing, this normalizes all island sizes relative to their real-world surface area.
For complex models with many islands, consider third-party add-ons like UVPackmaster (there is a free version available) which produces significantly tighter packing than Blender's built-in algorithm, especially for high-poly game assets.
Resolution rule of thumb: For game assets aim for a 2048x2048 texture with tight UV packing. For archviz and product renders, a 4096x4096 texture with good packing gives you crisp close-up detail without visible pixelation.
TIP 05 - Use a Checker Texture to Spot Problems Instantly
No matter how carefully you've placed seams and packed islands, you should always test your UV layout with a checker texture before applying your real materials. A checker texture, a simple grid of equal squares in alternating colors, makes every UV problem immediately visible to the naked eye.
Stretched UVs appear as elongated rectangles in the grid instead of squares. Badly-scaled islands show up as inconsistent checker square sizes across different parts of the model. Seam placement issues reveal themselves as discontinuities where the checker pattern doesn't line up. Overlapping islands show identical checker patterns on different parts of the model simultaneously.
How to apply a checker texture in Blender:
In the Shader Editor, add a new material to your object
Add a Texture Coordinate node - connect UV output to a Mapping node
Connect the Mapping node to an Image Texture node - set it to your checker image
Alternatively: use Blender's built-in Checker Texture node (Add > Texture > Checker Texture) connected directly to the Base Color of your Principled BSDF - no image needed
Look at your model in the viewport with the checker applied. Every square on the model should be the same size, and the pattern should flow continuously across edges without jumping or stretching. If it doesn't, find the problem island in the UV editor and fix it before moving on.
Time investment: Spending two minutes checking UVs with a checker texture saves you potentially hours of wondering why your final texture looks wrong after you've already built your entire material network.
TIP 06 - Understand Texel Density - Keep It Consistent Across Your Scene
Texel density is the number of texture pixels (texels) per unit of real-world surface area on your model. It's the metric that determines whether your textures look crisp and consistent across an entire scene, or whether some objects look sharp while others look blurry and low-resolution.
Inconsistent texel density is one of the telltale signs of an amateur 3D render. You've definitely seen it: a beautiful scene where the floor texture looks crisp and detailed, but the chair in the corner looks fuzzy and low-res, even though both use 2K textures. That's a texel density mismatch.
How to think about texel density practically:
For a consistent scene, all objects at similar camera distances should have similar texel density - the same number of texture pixels per real-world centimeter
Objects that appear close to camera in your final render deserve higher texel density - they benefit most from resolution
Background props that are always far from camera can have lower texel density - the detail isn't visible anyway
Characters and hero props (the main focus of your scene) always get the highest texel density budget
In Blender, the TexTools add-on (free) has a built-in texel density checker that lets you set a target density and automatically scale UV islands to match it across multiple objects. For serious archviz or game asset work, this is an invaluable tool.
Simple rule: If you're unsure about texel density, just use your checker texture test from Tip 5. If the checker squares look the same size on your sofa, your floor, and your side table, your texel density is consistent enough for most purposes.
TIP 07 - Learn When NOT to UV Unwrap - Use Procedural Textures
Here's the tip most UV tutorials never tell you: sometimes the best UV unwrap is no UV unwrap at all. Blender's procedural texture system, using generated or object texture coordinates instead of UV coordinates, produces perfectly tileable, seam-free results on many common materials without any unwrapping required.
Procedural textures are generated mathematically based on the 3D position of each point on your model, rather than relying on a 2D UV map. This means they automatically follow the shape of your object, never stretch, and have no seams by definition.
When procedural textures beat UV maps:
Plain concrete, brick, stone, or wood grain on architectural surfaces, tile seamlessly across any shape
Ground planes, walls, and floors, huge flat surfaces that would need massive UV islands
Background objects and environment props where texture detail isn't scrutinized closely
Quick blocking and previz work where you need to establish material identity fast
Organic shapes like rocks, terrain, and natural forms where seam placement is genuinely difficult
When you still need proper UV maps:
Characters and organic assets that need specific painted detail (skin markings, worn edges, specific stains)
Game assets that must use baked texture maps for performance
Any model where you need precise control over exactly where specific texture details appear
Assets going into game engines like Unreal or Unity which expect UV-based texture coordinates
The most efficient 3D artists mix both approaches intelligently, procedural textures for backgrounds and simple materials, UV-mapped textures for hero assets and anything requiring precise control.
Blender shortcut: In the Shader Editor, swap your Texture Coordinate node from UV to Generated or Object and watch your texture immediately become seam-free. For many simple materials this is the fastest solution.
Quick Reference: Your UV Unwrapping Checklist
Before you start texturing any model, run through this checklist:
Apply scale (Ctrl + A in Object Mode) - always, no exceptions
Plan seam placement before marking anything - think about what the camera will see
Mark seams along hidden or low-visibility edges
Use Smart UV Project for hard surface / flat-faced geometry, manual unwrap for organic shapes
Test with a checker texture - fix any stretching or size inconsistencies
Pack islands efficiently - minimize wasted UV space
Check texel density - ensure consistency across all objects in the scene
Consider procedural textures for backgrounds and simple repeating materials
🎯 The bottom line on UV unwrapping
UV unwrapping isn't glamorous work. It doesn't have the immediate visual payoff of modeling or rendering. But it is the foundation that every great texture sits on. Invest time in getting your UVs right and everything downstream, your materials, your renders, your portfolio, gets better automatically. These 7 tips cover 95% of the real-world situations you'll encounter as a 3D artist in Blender.
Practice UV Unwrapping on Real Assets - Download Free 3D Models
The fastest way to improve your UV unwrapping skills is to practice on real, production-quality models, not just basic primitives. On Korvix3D you'll find hundreds of free 3D models across every category, ready to download and unwrap in Blender right now.
Furniture & Interior Props - perfect for practicing hard surface UV unwrapping
Architectural Assets - great for Smart UV Project and procedural texture workflows
Plant & Nature Models - ideal for organic unwrapping with manual seam placement
Industrial & Mechanical Props - excellent for understanding texel density across complex shapes
Download a model, open the UV editor, and apply every tip from this guide. Hands-on practice with real geometry is how UV unwrapping finally clicks, and once it does, you'll wonder how you ever found it difficult.

You spend hours modeling a beautiful 3D asset. You apply your texture. You hit render. And then, stretched pixels, blurry patches, and seams running right across the most visible part of your model. Sound familiar?
UV unwrapping is the step most beginners either skip, rush through, or quietly dread. It's that invisible layer of work between modeling and texturing that determines whether your final render looks polished and professional or like something went badly wrong. And yet, almost no beginner tutorial gives it the attention it deserves.
In this guide we're fixing that. Here are 7 practical, actionable tips that will transform how you approach UV unwrapping in Blender, and save you from the messy texture nightmares that plague so many 3D artists early in their journey.
💡 Quick refresher: What even is UV unwrapping?
Every 3D model is made of faces arranged in 3D space. UV unwrapping is the process of "unfolding" those faces flat, like cutting open a cardboard box, so a 2D texture image can be applied to them accurately. The U and V refer to the horizontal and vertical axes of that flat 2D space (since X, Y and Z are already used for 3D). Bad UVs = bad textures, no matter how good your texture image is.
TIP 01 - Always Check Your Scale Before Unwrapping
This is the single most common UV mistake beginners make, and it causes more wasted hours than almost anything else in Blender. Before you unwrap a single face, you must apply your object's scale.
Here's why it matters: when you scale an object in Object Mode without applying the transform, Blender remembers the original unscaled geometry internally. Your UV unwrap then tries to work with that original data, producing wildly inconsistent UV island sizes, textures that look huge on one face and tiny on another, even when you want them uniform.
The fix : two steps, ten seconds:
Select your object in Object Mode
Press Ctrl + A and choose "Apply Scale" (or "All Transforms" to be safe)
Do this before unwrapping every single object, every single time. Build it into your muscle memory. It costs nothing and saves enormous frustration later.
Pro tip: If you're working with multiple objects that need consistent texture scale, like a room full of furniture, applying scale to all of them before unwrapping ensures your textures tile uniformly across every surface.
TIP 02 - Place Seams Deliberately - Hide Them in Plain Sight
A seam is the cut line you make in your mesh that tells Blender where to "cut" the geometry when unfolding it flat. Every unwrap has seams, the goal isn't to eliminate them, it's to hide them somewhere they'll never be noticed.
Think of it like a tailor cutting fabric. A skilled tailor places the seam allowance along the inside of the collar, the underside of the arm, the back of the knee, somewhere hidden and structurally logical. UV seams work exactly the same way.
Where to place seams for common objects:
Characters & organic models - along the back of the neck, under the arms, inner legs, bottom of shoes
Hard surface objects (furniture, props) - along the underside, back edges, or inside corners that face away from camera
Cylindrical shapes (pillars, pipes, bottles) - one vertical seam running down the most hidden side
Architectural elements - along corners and edges that are typically in shadow
To mark a seam in Blender: select the edges you want to cut in Edit Mode, then press Ctrl + E and choose "Mark Seam." The edges turn red to confirm. Once all seams are placed, select all faces with A and press U, then "Unwrap."
Key insight: Seams in low-traffic areas of your model (areas rarely seen by the camera) are invisible in practice. Seams on prominent flat surfaces will always show as texture discontinuities. Plan your seam placement before you start cutting.
TIP 03 - Use Smart UV Project for Hard Surface Models
Blender's standard "Unwrap" algorithm is excellent for organic shapes with carefully placed seams. But for hard surface models, furniture, buildings, mechanical props, architectural elements, there's a faster, often better option: Smart UV Project.
Smart UV Project automatically analyzes the angles between faces and creates UV islands based on those angles, without you needing to place a single seam manually. For objects with lots of flat surfaces at 90-degree angles, which describes most furniture, room props, and architectural assets, it produces clean, well-separated UV islands almost instantly.
How to use it:
In Edit Mode, select all faces with A
Press U to open the UV menu
Choose "Smart UV Project"
In the operator panel (bottom left), adjust the Angle Limit - 66 degrees works well for most hard surface models
Hit OK and check your UV editor - islands should be clean and separated
Smart UV Project won't work well for organic, curved, or cylindrical models, use manual seams for those. But for 80% of architectural props, furniture, and mechanical assets, it's a genuine time-saver.
Korvix3D tip: When working with free 3D models downloaded from Korvix3D, always check the existing UV map before retexturing. Many models ship with clean UVs already, you may not need to unwrap at all.
TIP 04 - Pack Your UV Islands Efficiently - Don't Waste Texture Space
Once your UV islands are laid out, they need to fit cleanly within the UV square (the 0-1 UV space). How you arrange them determines how much of your texture resolution is actually being used. Poor packing = wasted texture space = lower quality textures on your model at the same resolution.
Imagine printing a label for a package but leaving half the label paper blank. You're using the same amount of material but getting half the information on it. UV packing works the same way, you want every part of your texture image to be doing useful work.
Blender's built-in packing tools:
Select all islands with A in the UV Editor, then go to UV > Pack Islands - Blender will automatically rearrange your islands to fill the space efficiently
Adjust the Margin value in the operator panel - 0.001 to 0.003 works well for most models, leaving a small gap between islands to prevent texture bleeding
For models that need uniform texel density (same texture resolution across all surfaces), use the "Average Island Scale" option before packing, this normalizes all island sizes relative to their real-world surface area.
For complex models with many islands, consider third-party add-ons like UVPackmaster (there is a free version available) which produces significantly tighter packing than Blender's built-in algorithm, especially for high-poly game assets.
Resolution rule of thumb: For game assets aim for a 2048x2048 texture with tight UV packing. For archviz and product renders, a 4096x4096 texture with good packing gives you crisp close-up detail without visible pixelation.
TIP 05 - Use a Checker Texture to Spot Problems Instantly
No matter how carefully you've placed seams and packed islands, you should always test your UV layout with a checker texture before applying your real materials. A checker texture, a simple grid of equal squares in alternating colors, makes every UV problem immediately visible to the naked eye.
Stretched UVs appear as elongated rectangles in the grid instead of squares. Badly-scaled islands show up as inconsistent checker square sizes across different parts of the model. Seam placement issues reveal themselves as discontinuities where the checker pattern doesn't line up. Overlapping islands show identical checker patterns on different parts of the model simultaneously.
How to apply a checker texture in Blender:
In the Shader Editor, add a new material to your object
Add a Texture Coordinate node - connect UV output to a Mapping node
Connect the Mapping node to an Image Texture node - set it to your checker image
Alternatively: use Blender's built-in Checker Texture node (Add > Texture > Checker Texture) connected directly to the Base Color of your Principled BSDF - no image needed
Look at your model in the viewport with the checker applied. Every square on the model should be the same size, and the pattern should flow continuously across edges without jumping or stretching. If it doesn't, find the problem island in the UV editor and fix it before moving on.
Time investment: Spending two minutes checking UVs with a checker texture saves you potentially hours of wondering why your final texture looks wrong after you've already built your entire material network.
TIP 06 - Understand Texel Density - Keep It Consistent Across Your Scene
Texel density is the number of texture pixels (texels) per unit of real-world surface area on your model. It's the metric that determines whether your textures look crisp and consistent across an entire scene, or whether some objects look sharp while others look blurry and low-resolution.
Inconsistent texel density is one of the telltale signs of an amateur 3D render. You've definitely seen it: a beautiful scene where the floor texture looks crisp and detailed, but the chair in the corner looks fuzzy and low-res, even though both use 2K textures. That's a texel density mismatch.
How to think about texel density practically:
For a consistent scene, all objects at similar camera distances should have similar texel density - the same number of texture pixels per real-world centimeter
Objects that appear close to camera in your final render deserve higher texel density - they benefit most from resolution
Background props that are always far from camera can have lower texel density - the detail isn't visible anyway
Characters and hero props (the main focus of your scene) always get the highest texel density budget
In Blender, the TexTools add-on (free) has a built-in texel density checker that lets you set a target density and automatically scale UV islands to match it across multiple objects. For serious archviz or game asset work, this is an invaluable tool.
Simple rule: If you're unsure about texel density, just use your checker texture test from Tip 5. If the checker squares look the same size on your sofa, your floor, and your side table, your texel density is consistent enough for most purposes.
TIP 07 - Learn When NOT to UV Unwrap - Use Procedural Textures
Here's the tip most UV tutorials never tell you: sometimes the best UV unwrap is no UV unwrap at all. Blender's procedural texture system, using generated or object texture coordinates instead of UV coordinates, produces perfectly tileable, seam-free results on many common materials without any unwrapping required.
Procedural textures are generated mathematically based on the 3D position of each point on your model, rather than relying on a 2D UV map. This means they automatically follow the shape of your object, never stretch, and have no seams by definition.
When procedural textures beat UV maps:
Plain concrete, brick, stone, or wood grain on architectural surfaces, tile seamlessly across any shape
Ground planes, walls, and floors, huge flat surfaces that would need massive UV islands
Background objects and environment props where texture detail isn't scrutinized closely
Quick blocking and previz work where you need to establish material identity fast
Organic shapes like rocks, terrain, and natural forms where seam placement is genuinely difficult
When you still need proper UV maps:
Characters and organic assets that need specific painted detail (skin markings, worn edges, specific stains)
Game assets that must use baked texture maps for performance
Any model where you need precise control over exactly where specific texture details appear
Assets going into game engines like Unreal or Unity which expect UV-based texture coordinates
The most efficient 3D artists mix both approaches intelligently, procedural textures for backgrounds and simple materials, UV-mapped textures for hero assets and anything requiring precise control.
Blender shortcut: In the Shader Editor, swap your Texture Coordinate node from UV to Generated or Object and watch your texture immediately become seam-free. For many simple materials this is the fastest solution.
Quick Reference: Your UV Unwrapping Checklist
Before you start texturing any model, run through this checklist:
Apply scale (Ctrl + A in Object Mode) - always, no exceptions
Plan seam placement before marking anything - think about what the camera will see
Mark seams along hidden or low-visibility edges
Use Smart UV Project for hard surface / flat-faced geometry, manual unwrap for organic shapes
Test with a checker texture - fix any stretching or size inconsistencies
Pack islands efficiently - minimize wasted UV space
Check texel density - ensure consistency across all objects in the scene
Consider procedural textures for backgrounds and simple repeating materials
🎯 The bottom line on UV unwrapping
UV unwrapping isn't glamorous work. It doesn't have the immediate visual payoff of modeling or rendering. But it is the foundation that every great texture sits on. Invest time in getting your UVs right and everything downstream, your materials, your renders, your portfolio, gets better automatically. These 7 tips cover 95% of the real-world situations you'll encounter as a 3D artist in Blender.
Practice UV Unwrapping on Real Assets - Download Free 3D Models
The fastest way to improve your UV unwrapping skills is to practice on real, production-quality models, not just basic primitives. On Korvix3D you'll find hundreds of free 3D models across every category, ready to download and unwrap in Blender right now.
Furniture & Interior Props - perfect for practicing hard surface UV unwrapping
Architectural Assets - great for Smart UV Project and procedural texture workflows
Plant & Nature Models - ideal for organic unwrapping with manual seam placement
Industrial & Mechanical Props - excellent for understanding texel density across complex shapes
Download a model, open the UV editor, and apply every tip from this guide. Hands-on practice with real geometry is how UV unwrapping finally clicks, and once it does, you'll wonder how you ever found it difficult.
Must check resources: