"Production ready" is probably the most overused phrase in 3D asset listings. Type it into any marketplace search and you'll find thousands of results, everything from meticulously crafted professional assets down to basic beginner models that someone decided deserved the label before uploading. The phrase has been used so broadly it has almost lost meaning.
Which is a problem, because what it's supposed to describe is actually important. A genuinely production-ready asset is the difference between dropping something into your scene and getting on with your work, and spending two hours cleaning up after a file that wasn't built to the standard it claimed. For anyone working under deadlines, the distinction has a direct dollar cost.
This article explains what production ready actually means in practical terms, broken down into the specific technical and organizational qualities that experienced artists and studios look for. Not as a vague aspiration, but as a checklist of concrete things that either exist in an asset or don't.
Why "Production Ready" Needs a Real Definition

Before breaking down the specifics, it helps to understand why this phrase exists at all, and what problem it's trying to solve.
Most 3D models are made for a purpose. A beginner might model a chair to practice topology. A student might model a building to learn UV unwrapping. A concept artist might sketch out a vehicle in 3D to communicate a design idea. None of these models are intended to go into a real production pipeline, and so they're not built to the standards that a real production pipeline requires.
Production pipelines are unforgiving in ways that personal projects aren't. When an asset enters a film pipeline, a game engine, or a studio's visualization workflow, it will be touched by tools and processes the original creator never anticipated. It might be rigged by an animator who needs clean edge flow to deform properly. It might be instanced thousands of times by a technical director who needs exactly the right pivot point placement. It might be subjected to level-of-detail generation algorithms that fail on meshes with n-gons. It might be texture-baked by a pipeline that expects consistent UV naming conventions.
A model that wasn't built for any of this breaks in ways that are time-consuming to diagnose and fix. "Production ready" is supposed to mean that someone thought about all of this in advance, and the asset can enter a professional pipeline and behave predictably.
The reality is that it means that on the best assets, and means almost nothing on the worst ones. Here's how to tell the difference.
Clean Topology: The Foundation Everything Else Depends On
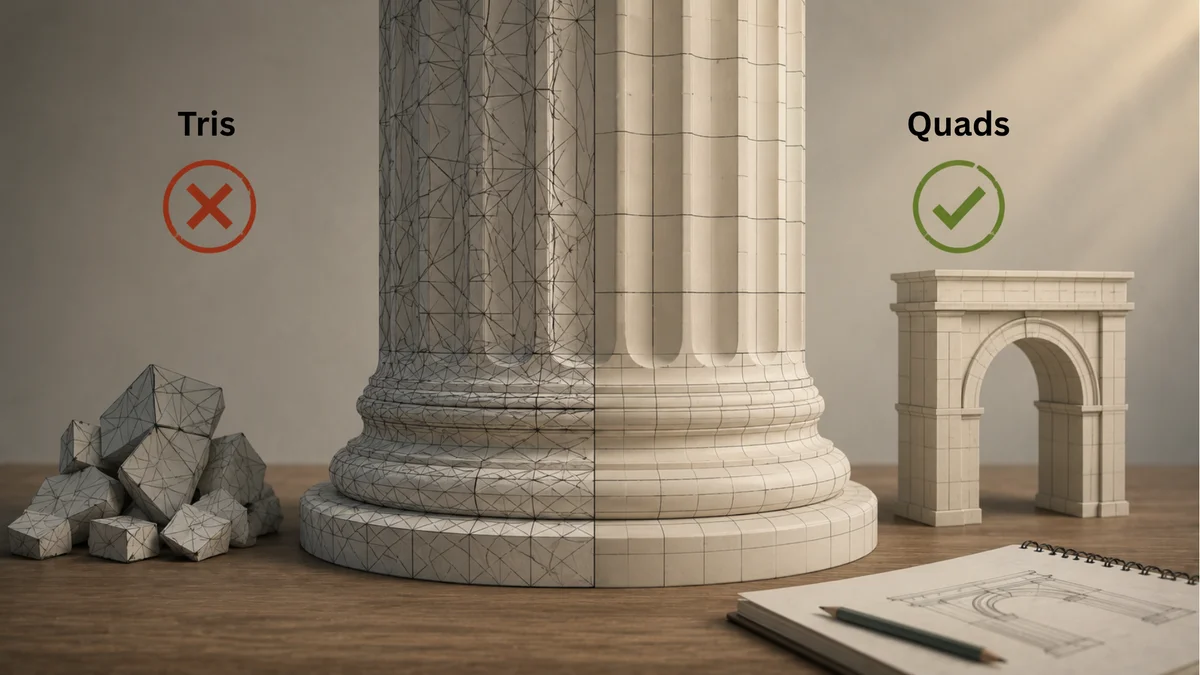
Topology is the structure of the mesh, specifically how the polygons are arranged, connected, and distributed across the surface of the model. It's invisible in a render under most circumstances, which is why it's the quality dimension most often faked or neglected on assets that claim to be production ready.
What clean topology actually looks like in practice:
The mesh is primarily composed of quads, four-sided polygons, rather than triangles or n-gons. This matters because quads subdivide predictably, deform cleanly during animation, and respond well to smoothing algorithms. Triangles are acceptable in static hard-surface models and are required by game engines, but tris distributed throughout an organic or soft-surface model signal that the creator didn't think carefully about how the mesh would be used.
N-gons, polygons with five or more sides, are the clearest red flag in topology review. They subdivide unpredictably, cause render artifacts under certain lighting conditions, and indicate either beginner technique or rushed work. A production-ready asset should have no n-gons except in flat, non-visible areas where the polygon type genuinely doesn't matter.
The edge flow supports the object's function. This is the part that requires real judgment rather than just counting polygon types. On a character mesh, edges should run along the directions that the surface will crease and stretch during animation. On a hard-surface object, edges should define the silhouette cleanly and support the tight bevels on corners without creating pinching artifacts. An asset might be all quads and still have edge flow that doesn't support how the object is actually used.
Polygon density is appropriate for the object's visual complexity. A production-ready asset doesn't use more polygons than necessary to achieve its visual quality, and doesn't use fewer than needed to maintain clean silhouettes and surface detail at its intended render distance. Both extremes cause problems: too dense and the asset becomes a performance issue; too sparse and the silhouette reads as blocky under close scrutiny.
UV Mapping: The Part That Bites You When You Try to Modify Anything

UV mapping is the process of unfolding a 3D surface into a flat 2D representation so that textures can be applied accurately. It's one of the least glamorous parts of 3D asset creation and one of the most consequential for anyone who needs to work with the asset after the fact.
A production-ready UV layout has a few specific qualities:
No unintentional overlapping UV islands. Overlapping UVs mean multiple parts of the mesh are mapped to the same area of the texture, which causes those areas to share texture data. This can be intentional for symmetrical objects where both sides should look identical, but unintentional overlaps produce baking errors, lightmap problems in game engines, and material artifacts in offline renderers. A production-ready asset either has no overlapping UVs, or documents clearly where intentional overlaps exist and why.
Efficient use of texture space. The UV islands, the flattened sections of the mesh, should fill the available texture space without large empty gaps. An asset where UV islands cover only 40% of the available space is wasting 60% of the texture's resolution, which means the effective resolution is much lower than the texture file size suggests.
Logical seam placement. UV seams, the cuts made to allow a 3D surface to unfold flat, leave visible lines in certain workflows, particularly in baking and in procedural texture applications. Production-ready assets place seams along natural edges of the object, along creases, into recesses, or along surfaces that face away from the viewer, rather than running across prominent visible surfaces.
Consistent texel density across the mesh. Texel density refers to how much texture resolution is allocated to each part of the surface. A production-ready asset allocates texture space proportionally to the visual importance and size of each surface, rather than giving a small decorative detail the same texture real estate as a large primary surface.
PBR Textures: What a Full Set Actually Includes
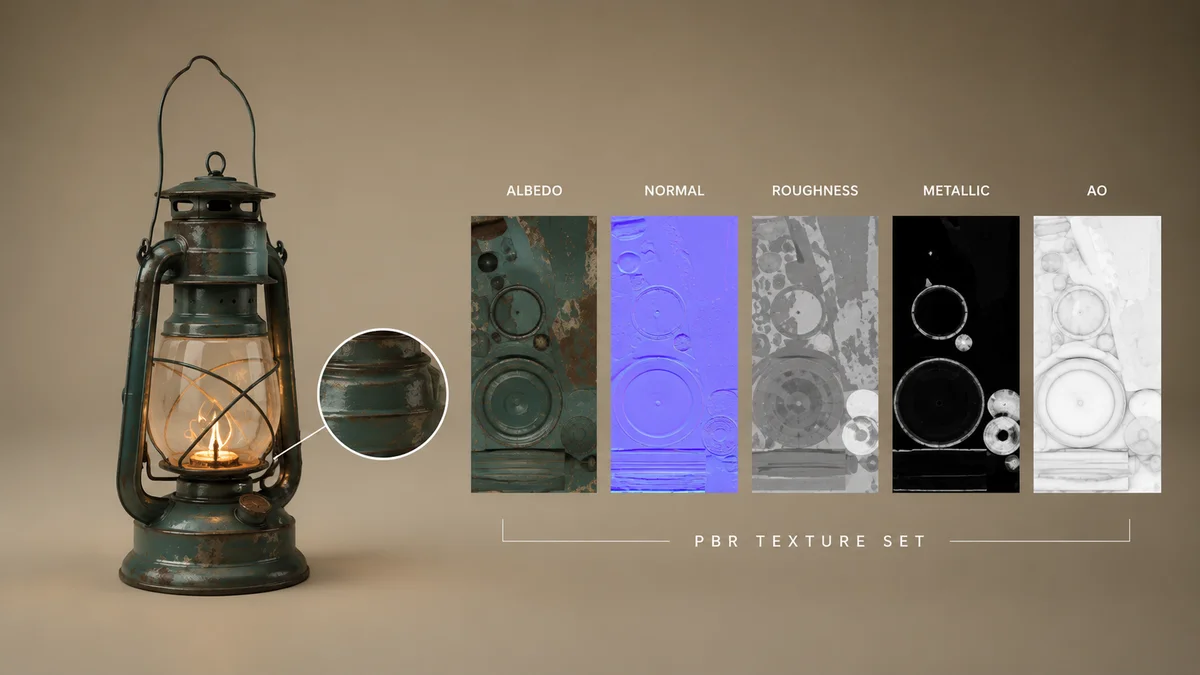
The phrase "PBR textures included" on an asset listing tells you less than it appears to. PBR, physically based rendering, is a framework for how materials interact with light in a realistic way, but the specific maps included in a "PBR set" varies significantly between creators and platforms.
A genuinely complete PBR texture set for a production-ready asset includes:
An albedo or base color map, which defines the surface color and diffuse reflectance of the material without any embedded lighting or shadowing. A common mistake on non-production-ready assets is including pre-baked ambient occlusion or directional lighting in the albedo texture, which causes the material to look inconsistent under different lighting conditions.
A normal map in the correct color space and format for the intended renderer. Normal maps contain tangent-space normal data that simulates fine surface detail without adding geometry. The common technical failures here are the texture being saved in the wrong color space, which causes a muddy, incorrect appearance in render, or the Y-axis being inverted, which causes the surface detail to appear pushed in rather than raised.
A roughness map controlling the micro-surface roughness of the material, which determines how sharp or blurry reflections appear on the surface. Glossiness maps are the inverse of roughness maps, and a production-ready asset should document clearly which convention is being used since the two look dramatically different when accidentally swapped.
A metalness or metallic map for assets that include metal surfaces. This map defines which parts of the surface behave as metals, with highly conductive reflectance properties, versus which parts behave as dielectrics, with the more typical diffuse-plus-specular behavior.
An ambient occlusion map that captures the soft shadowing in crevices and recessed areas of the surface. This is a separate concern from the albedo texture, and keeping AO in its own map rather than baking it into the albedo gives the end user control over how much AO they apply and allows the material to work correctly under varied lighting conditions.
For assets where surface micro-displacement matters, typically stone, fabric, leather, or any material where genuine surface geometry rather than simulated detail is important, a displacement or height map completes the set.
Scene Organization: The Unglamorous Part That Trips Up Pipelines
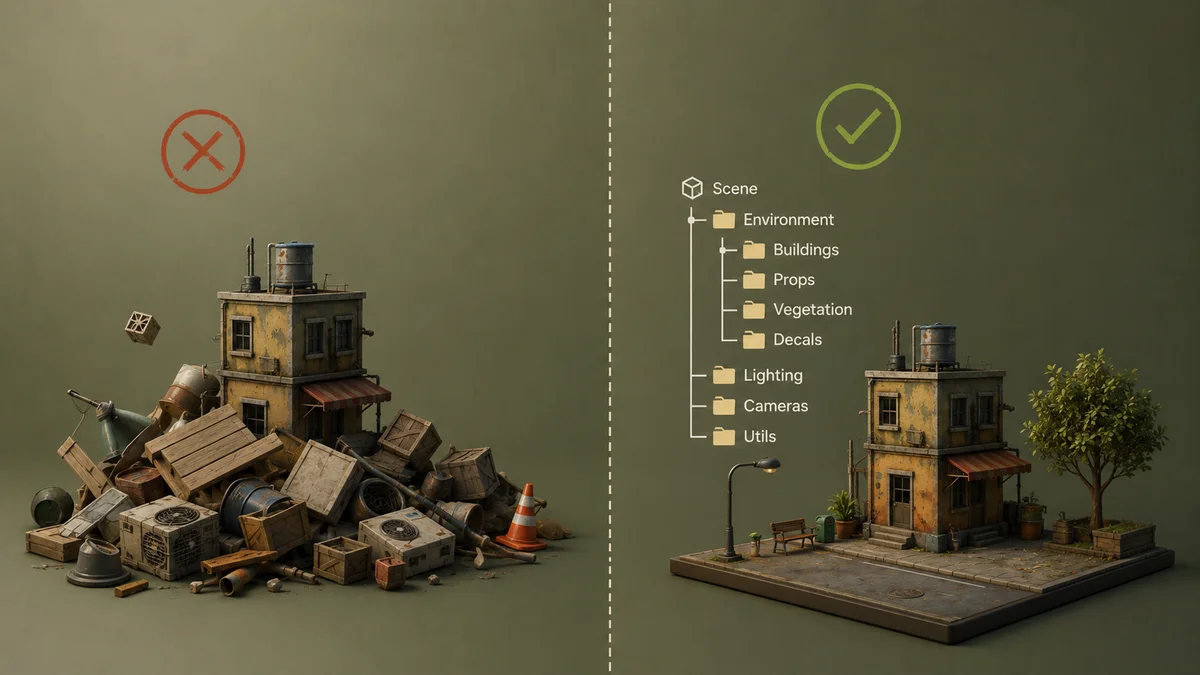
A 3D model can have perfect topology and beautiful textures and still break a production pipeline because of how its scene data is organized. This category of production readiness is the least visible and the most consequential when something goes wrong.
Production-ready scene organization includes:
Sensible object and mesh naming. Every object, mesh, material, and texture in the asset file should have a descriptive, consistent name that makes its purpose immediately clear. "Chair_BackCushion_Left" tells you exactly what that mesh is. "Object001" tells you nothing, and when a scene contains forty objects all named "Object001" through "Object040," navigating it becomes a puzzle.
Correct pivot point placement. The pivot point, or origin, of a 3D object determines how it rotates, scales, and positions relative to the scene. Production-ready assets place pivots at logical locations: at the center-bottom of objects that sit on floors, at the hinge point of objects that rotate open, at the origin of objects that need to be arrayed or instanced. A sofa with its pivot floating three meters above its geometry is going to cause problems the moment anyone tries to position it in a scene.
Transforms applied and reset. Before delivery, the object's scale, rotation, and position transforms should either be at clean values (scale 1,1,1 or the appropriate equivalent for the format) or clearly documented if they aren't. An asset with a scale value of 0.01 stored in the transform causes problems for modifiers, physics simulations, and any tool that reads transform values.
No orphaned or hidden data. Production-ready assets shouldn't contain hidden objects, disabled modifiers that were used during modeling and never cleaned up, or leftover helper objects from the creation process. These add file size, create confusion, and occasionally cause unexpected behavior when the file is opened in a different software version.
Real-World Scale: Why It Matters More Than It Seems

A chair modeled at the wrong scale is more than an inconvenience. In architectural visualization, scale errors make spaces read incorrectly even when the viewer can't articulate why. In game development, scale errors produce player characters who tower over furniture or crouch underneath doorways. In any production where multiple assets from different sources need to coexist in the same scene, inconsistent scales mean constant manual adjustment every time something new comes in.
Production-ready assets are modeled at real-world scale in a clearly documented unit system. A standard chair seat should be around 45 centimeters from the floor. A standard interior door should be around 200 to 210 centimeters tall. A typical sedan should be around 170 to 180 centimeters at roof height. These aren't arbitrary numbers; they're the measurements of actual objects, and an asset that deviates significantly from real-world dimensions is going to look wrong in context even if it looks plausible in isolation.
Why Korvix3D's Quality System Addresses This Directly

What makes the "production ready" label meaningless on many platforms is that there's no enforcement. Creators self-report, and the incentive is to describe assets as favorably as possible regardless of whether they actually meet production standards.
Korvix3D's creator payout system creates a different incentive structure. Because creator earnings are weighted by a quality multiplier, a composite of admin quality ratings at 60% and user reviews at 40%, assets that claim production readiness but fail in practice get that failure reflected in their ratings. Lower ratings mean lower earnings per download, which means creators have a direct financial incentive to either build genuinely to the standard or to not claim it.
This doesn't make every asset in the library perfect. It means the economic structure of the platform rewards creators who build properly and penalizes those who don't, which over time lifts the quality floor across the entire library in a way that self-reported labels never can.
For buyers and subscribers using the platform, the quality rating attached to each asset is a more reliable signal than "production ready" written by the creator in their own listing description.
Browse quality-rated assets on Korvix3D → https://korvix3d.com/models
The Quick Version: What Production Ready Actually Requires
Summing up the above in terms of what to check for when evaluating any asset that claims this standard:
Topology built primarily from quads, with no n-gons outside non-critical flat areas, edge flow that supports the object's intended use, and polygon density appropriate for the visual complexity and intended render context.
UV mapping with no unintentional overlapping islands, efficient use of available texture space, logical seam placement away from prominent visible surfaces, and consistent texel density across the mesh.
A complete PBR texture set including albedo, normal, roughness, metalness, and ambient occlusion at minimum, all saved in correct color spaces, with clear documentation of whether glossiness or roughness convention is used.
Scene organization with logical naming for all objects and materials, pivot points at meaningful locations, transforms at clean values, and no orphaned or hidden data from the creation process.
Real-world scale in a documented unit system, with dimensions that match the physical reality of the object being represented.
Format availability matching the intended production context, with multiple formats provided for general-purpose assets.
An asset that genuinely meets all of these criteria will enter almost any professional pipeline and behave predictably. That's what the phrase is supposed to mean, and it's the standard worth holding any asset to before trusting it with a deadline project.
Frequently Asked Questions
What is the difference between game ready and production ready? Game ready typically refers specifically to real-time optimization, low polygon counts, baked texture maps, and LOD variants prepared for game engine performance budgets. Production ready is a broader standard that applies across film, visualization, and game contexts, covering topology quality, UV mapping, PBR texture completeness, scene organization, and scale accuracy. A game-ready asset should also be production ready, but a production-ready asset isn't necessarily game-ready if it hasn't been optimized for real-time use.
How do I check if an asset has clean topology before downloading? Look for a wireframe view in the asset listing. Clean topology looks visually regular in wireframe, with consistent quad flow and no irregular polygon density. The absence of a wireframe view in the listing is not proof of bad topology, but the presence of one from a creator who's confident in their work is a meaningful positive signal.
Why does pivot point placement matter for 3D assets? Pivot points determine how an object rotates and scales. An object with its pivot placed at an unexpected location will spin around that point when rotated, which produces unexpected behavior in any animation, constraint, or instancing setup. Objects that sit on the floor should have their pivot at the floor level, so they can be positioned by snapping the pivot to a floor surface rather than by manually adjusting the position to compensate for an offset pivot.
How important is texture color space for production use? Very important, and it's one of the most common sources of incorrect material appearance in production. The albedo texture should be in sRGB color space. All other maps including normal, roughness, metalness, and ambient occlusion should be in linear or raw color space. A normal map saved as sRGB instead of raw will look visually correct in a thumbnail but produce incorrect shading in render. This is a technical detail the asset creator needs to get right, not something the end user should have to diagnose and fix.
What file formats should a production-ready asset include? At minimum, FBX and OBJ for maximum compatibility, plus GLTF for web and real-time contexts. For assets targeting specific pipelines, native formats like .blend for Blender or .max for 3DS Max add significant value. On platforms with native bridge plugins like Korvix3D, the format question becomes less critical since the plugin handles delivery in the correct format for your active software.




"Production ready" is probably the most overused phrase in 3D asset listings. Type it into any marketplace search and you'll find thousands of results, everything from meticulously crafted professional assets down to basic beginner models that someone decided deserved the label before uploading. The phrase has been used so broadly it has almost lost meaning.
Which is a problem, because what it's supposed to describe is actually important. A genuinely production-ready asset is the difference between dropping something into your scene and getting on with your work, and spending two hours cleaning up after a file that wasn't built to the standard it claimed. For anyone working under deadlines, the distinction has a direct dollar cost.
This article explains what production ready actually means in practical terms, broken down into the specific technical and organizational qualities that experienced artists and studios look for. Not as a vague aspiration, but as a checklist of concrete things that either exist in an asset or don't.
Why "Production Ready" Needs a Real Definition
Before breaking down the specifics, it helps to understand why this phrase exists at all, and what problem it's trying to solve.
Most 3D models are made for a purpose. A beginner might model a chair to practice topology. A student might model a building to learn UV unwrapping. A concept artist might sketch out a vehicle in 3D to communicate a design idea. None of these models are intended to go into a real production pipeline, and so they're not built to the standards that a real production pipeline requires.
Production pipelines are unforgiving in ways that personal projects aren't. When an asset enters a film pipeline, a game engine, or a studio's visualization workflow, it will be touched by tools and processes the original creator never anticipated. It might be rigged by an animator who needs clean edge flow to deform properly. It might be instanced thousands of times by a technical director who needs exactly the right pivot point placement. It might be subjected to level-of-detail generation algorithms that fail on meshes with n-gons. It might be texture-baked by a pipeline that expects consistent UV naming conventions.
A model that wasn't built for any of this breaks in ways that are time-consuming to diagnose and fix. "Production ready" is supposed to mean that someone thought about all of this in advance, and the asset can enter a professional pipeline and behave predictably.
The reality is that it means that on the best assets, and means almost nothing on the worst ones. Here's how to tell the difference.
Clean Topology: The Foundation Everything Else Depends On
Topology is the structure of the mesh, specifically how the polygons are arranged, connected, and distributed across the surface of the model. It's invisible in a render under most circumstances, which is why it's the quality dimension most often faked or neglected on assets that claim to be production ready.
What clean topology actually looks like in practice:
The mesh is primarily composed of quads, four-sided polygons, rather than triangles or n-gons. This matters because quads subdivide predictably, deform cleanly during animation, and respond well to smoothing algorithms. Triangles are acceptable in static hard-surface models and are required by game engines, but tris distributed throughout an organic or soft-surface model signal that the creator didn't think carefully about how the mesh would be used.
N-gons, polygons with five or more sides, are the clearest red flag in topology review. They subdivide unpredictably, cause render artifacts under certain lighting conditions, and indicate either beginner technique or rushed work. A production-ready asset should have no n-gons except in flat, non-visible areas where the polygon type genuinely doesn't matter.
The edge flow supports the object's function. This is the part that requires real judgment rather than just counting polygon types. On a character mesh, edges should run along the directions that the surface will crease and stretch during animation. On a hard-surface object, edges should define the silhouette cleanly and support the tight bevels on corners without creating pinching artifacts. An asset might be all quads and still have edge flow that doesn't support how the object is actually used.
Polygon density is appropriate for the object's visual complexity. A production-ready asset doesn't use more polygons than necessary to achieve its visual quality, and doesn't use fewer than needed to maintain clean silhouettes and surface detail at its intended render distance. Both extremes cause problems: too dense and the asset becomes a performance issue; too sparse and the silhouette reads as blocky under close scrutiny.
UV Mapping: The Part That Bites You When You Try to Modify Anything
UV mapping is the process of unfolding a 3D surface into a flat 2D representation so that textures can be applied accurately. It's one of the least glamorous parts of 3D asset creation and one of the most consequential for anyone who needs to work with the asset after the fact.
A production-ready UV layout has a few specific qualities:
No unintentional overlapping UV islands. Overlapping UVs mean multiple parts of the mesh are mapped to the same area of the texture, which causes those areas to share texture data. This can be intentional for symmetrical objects where both sides should look identical, but unintentional overlaps produce baking errors, lightmap problems in game engines, and material artifacts in offline renderers. A production-ready asset either has no overlapping UVs, or documents clearly where intentional overlaps exist and why.
Efficient use of texture space. The UV islands, the flattened sections of the mesh, should fill the available texture space without large empty gaps. An asset where UV islands cover only 40% of the available space is wasting 60% of the texture's resolution, which means the effective resolution is much lower than the texture file size suggests.
Logical seam placement. UV seams, the cuts made to allow a 3D surface to unfold flat, leave visible lines in certain workflows, particularly in baking and in procedural texture applications. Production-ready assets place seams along natural edges of the object, along creases, into recesses, or along surfaces that face away from the viewer, rather than running across prominent visible surfaces.
Consistent texel density across the mesh. Texel density refers to how much texture resolution is allocated to each part of the surface. A production-ready asset allocates texture space proportionally to the visual importance and size of each surface, rather than giving a small decorative detail the same texture real estate as a large primary surface.
PBR Textures: What a Full Set Actually Includes
The phrase "PBR textures included" on an asset listing tells you less than it appears to. PBR, physically based rendering, is a framework for how materials interact with light in a realistic way, but the specific maps included in a "PBR set" varies significantly between creators and platforms.
A genuinely complete PBR texture set for a production-ready asset includes:
An albedo or base color map, which defines the surface color and diffuse reflectance of the material without any embedded lighting or shadowing. A common mistake on non-production-ready assets is including pre-baked ambient occlusion or directional lighting in the albedo texture, which causes the material to look inconsistent under different lighting conditions.
A normal map in the correct color space and format for the intended renderer. Normal maps contain tangent-space normal data that simulates fine surface detail without adding geometry. The common technical failures here are the texture being saved in the wrong color space, which causes a muddy, incorrect appearance in render, or the Y-axis being inverted, which causes the surface detail to appear pushed in rather than raised.
A roughness map controlling the micro-surface roughness of the material, which determines how sharp or blurry reflections appear on the surface. Glossiness maps are the inverse of roughness maps, and a production-ready asset should document clearly which convention is being used since the two look dramatically different when accidentally swapped.
A metalness or metallic map for assets that include metal surfaces. This map defines which parts of the surface behave as metals, with highly conductive reflectance properties, versus which parts behave as dielectrics, with the more typical diffuse-plus-specular behavior.
An ambient occlusion map that captures the soft shadowing in crevices and recessed areas of the surface. This is a separate concern from the albedo texture, and keeping AO in its own map rather than baking it into the albedo gives the end user control over how much AO they apply and allows the material to work correctly under varied lighting conditions.
For assets where surface micro-displacement matters, typically stone, fabric, leather, or any material where genuine surface geometry rather than simulated detail is important, a displacement or height map completes the set.
Scene Organization: The Unglamorous Part That Trips Up Pipelines
A 3D model can have perfect topology and beautiful textures and still break a production pipeline because of how its scene data is organized. This category of production readiness is the least visible and the most consequential when something goes wrong.
Production-ready scene organization includes:
Sensible object and mesh naming. Every object, mesh, material, and texture in the asset file should have a descriptive, consistent name that makes its purpose immediately clear. "Chair_BackCushion_Left" tells you exactly what that mesh is. "Object001" tells you nothing, and when a scene contains forty objects all named "Object001" through "Object040," navigating it becomes a puzzle.
Correct pivot point placement. The pivot point, or origin, of a 3D object determines how it rotates, scales, and positions relative to the scene. Production-ready assets place pivots at logical locations: at the center-bottom of objects that sit on floors, at the hinge point of objects that rotate open, at the origin of objects that need to be arrayed or instanced. A sofa with its pivot floating three meters above its geometry is going to cause problems the moment anyone tries to position it in a scene.
Transforms applied and reset. Before delivery, the object's scale, rotation, and position transforms should either be at clean values (scale 1,1,1 or the appropriate equivalent for the format) or clearly documented if they aren't. An asset with a scale value of 0.01 stored in the transform causes problems for modifiers, physics simulations, and any tool that reads transform values.
No orphaned or hidden data. Production-ready assets shouldn't contain hidden objects, disabled modifiers that were used during modeling and never cleaned up, or leftover helper objects from the creation process. These add file size, create confusion, and occasionally cause unexpected behavior when the file is opened in a different software version.
Real-World Scale: Why It Matters More Than It Seems
A chair modeled at the wrong scale is more than an inconvenience. In architectural visualization, scale errors make spaces read incorrectly even when the viewer can't articulate why. In game development, scale errors produce player characters who tower over furniture or crouch underneath doorways. In any production where multiple assets from different sources need to coexist in the same scene, inconsistent scales mean constant manual adjustment every time something new comes in.
Production-ready assets are modeled at real-world scale in a clearly documented unit system. A standard chair seat should be around 45 centimeters from the floor. A standard interior door should be around 200 to 210 centimeters tall. A typical sedan should be around 170 to 180 centimeters at roof height. These aren't arbitrary numbers; they're the measurements of actual objects, and an asset that deviates significantly from real-world dimensions is going to look wrong in context even if it looks plausible in isolation.
Why Korvix3D's Quality System Addresses This Directly
What makes the "production ready" label meaningless on many platforms is that there's no enforcement. Creators self-report, and the incentive is to describe assets as favorably as possible regardless of whether they actually meet production standards.
Korvix3D's creator payout system creates a different incentive structure. Because creator earnings are weighted by a quality multiplier, a composite of admin quality ratings at 60% and user reviews at 40%, assets that claim production readiness but fail in practice get that failure reflected in their ratings. Lower ratings mean lower earnings per download, which means creators have a direct financial incentive to either build genuinely to the standard or to not claim it.
This doesn't make every asset in the library perfect. It means the economic structure of the platform rewards creators who build properly and penalizes those who don't, which over time lifts the quality floor across the entire library in a way that self-reported labels never can.
For buyers and subscribers using the platform, the quality rating attached to each asset is a more reliable signal than "production ready" written by the creator in their own listing description.
Browse quality-rated assets on Korvix3D → https://korvix3d.com/models
The Quick Version: What Production Ready Actually Requires
Summing up the above in terms of what to check for when evaluating any asset that claims this standard:
Topology built primarily from quads, with no n-gons outside non-critical flat areas, edge flow that supports the object's intended use, and polygon density appropriate for the visual complexity and intended render context.
UV mapping with no unintentional overlapping islands, efficient use of available texture space, logical seam placement away from prominent visible surfaces, and consistent texel density across the mesh.
A complete PBR texture set including albedo, normal, roughness, metalness, and ambient occlusion at minimum, all saved in correct color spaces, with clear documentation of whether glossiness or roughness convention is used.
Scene organization with logical naming for all objects and materials, pivot points at meaningful locations, transforms at clean values, and no orphaned or hidden data from the creation process.
Real-world scale in a documented unit system, with dimensions that match the physical reality of the object being represented.
Format availability matching the intended production context, with multiple formats provided for general-purpose assets.
An asset that genuinely meets all of these criteria will enter almost any professional pipeline and behave predictably. That's what the phrase is supposed to mean, and it's the standard worth holding any asset to before trusting it with a deadline project.
Frequently Asked Questions
What is the difference between game ready and production ready? Game ready typically refers specifically to real-time optimization, low polygon counts, baked texture maps, and LOD variants prepared for game engine performance budgets. Production ready is a broader standard that applies across film, visualization, and game contexts, covering topology quality, UV mapping, PBR texture completeness, scene organization, and scale accuracy. A game-ready asset should also be production ready, but a production-ready asset isn't necessarily game-ready if it hasn't been optimized for real-time use.
How do I check if an asset has clean topology before downloading? Look for a wireframe view in the asset listing. Clean topology looks visually regular in wireframe, with consistent quad flow and no irregular polygon density. The absence of a wireframe view in the listing is not proof of bad topology, but the presence of one from a creator who's confident in their work is a meaningful positive signal.
Why does pivot point placement matter for 3D assets? Pivot points determine how an object rotates and scales. An object with its pivot placed at an unexpected location will spin around that point when rotated, which produces unexpected behavior in any animation, constraint, or instancing setup. Objects that sit on the floor should have their pivot at the floor level, so they can be positioned by snapping the pivot to a floor surface rather than by manually adjusting the position to compensate for an offset pivot.
How important is texture color space for production use? Very important, and it's one of the most common sources of incorrect material appearance in production. The albedo texture should be in sRGB color space. All other maps including normal, roughness, metalness, and ambient occlusion should be in linear or raw color space. A normal map saved as sRGB instead of raw will look visually correct in a thumbnail but produce incorrect shading in render. This is a technical detail the asset creator needs to get right, not something the end user should have to diagnose and fix.
What file formats should a production-ready asset include? At minimum, FBX and OBJ for maximum compatibility, plus GLTF for web and real-time contexts. For assets targeting specific pipelines, native formats like .blend for Blender or .max for 3DS Max add significant value. On platforms with native bridge plugins like Korvix3D, the format question becomes less critical since the plugin handles delivery in the correct format for your active software.