Picture this. You are mid-project, deadline looming, and you need that brick wall texture you used three months ago. You remember downloading it. You remember it looked perfect. But you have absolutely no idea where it lives on your hard drive.
Twenty minutes later, after digging through folders named "stuff", "final", "final_v2", and "NEW FINAL USE THIS ONE", you give up and download a replacement.
Sound familiar?
A disorganized 3D asset library is one of the single biggest hidden productivity killers in any creative workflow. It does not announce itself loudly. It bleeds your time slowly, a few minutes here, a frustrating search there, until hours of your week are quietly disappearing into the chaos of your own file system.
This guide gives you the complete system to fix that permanently. Folder structures, naming conventions, tagging, metadata, preview thumbnails, and the tools that tie it all together. Whether you are a solo freelancer with a modest library or a studio managing thousands of assets across a team, this framework scales to fit.
Why Most 3D Artists Have Chaotic Asset Libraries
Before we build the solution, it is worth understanding why this problem is so universal.
Assets come from too many places at once. You download from marketplaces, rip from old projects, export from client work, buy packs, receive files from collaborators, and generate procedural assets. Each source has its own naming convention and folder structure, or no structure at all.
There is never a good time to organise. When you are in the middle of a project, organisation feels like a distraction. When the project ends, you move straight to the next one. The library never gets the attention it needs.
Software does not enforce structure. Unlike a DAM (Digital Asset Management) system used in large studios, most 3D artists work directly off their file system. Your operating system will let you name a folder anything and put it anywhere. Chaos is always one bad save dialog away.
Asset libraries grow fast. A library that is manageable at 500 files becomes unworkable at 5,000. Artists who do not build a scalable system early find themselves in trouble quickly.
The good news: fixing this is not complicated. It just requires a system applied consistently.
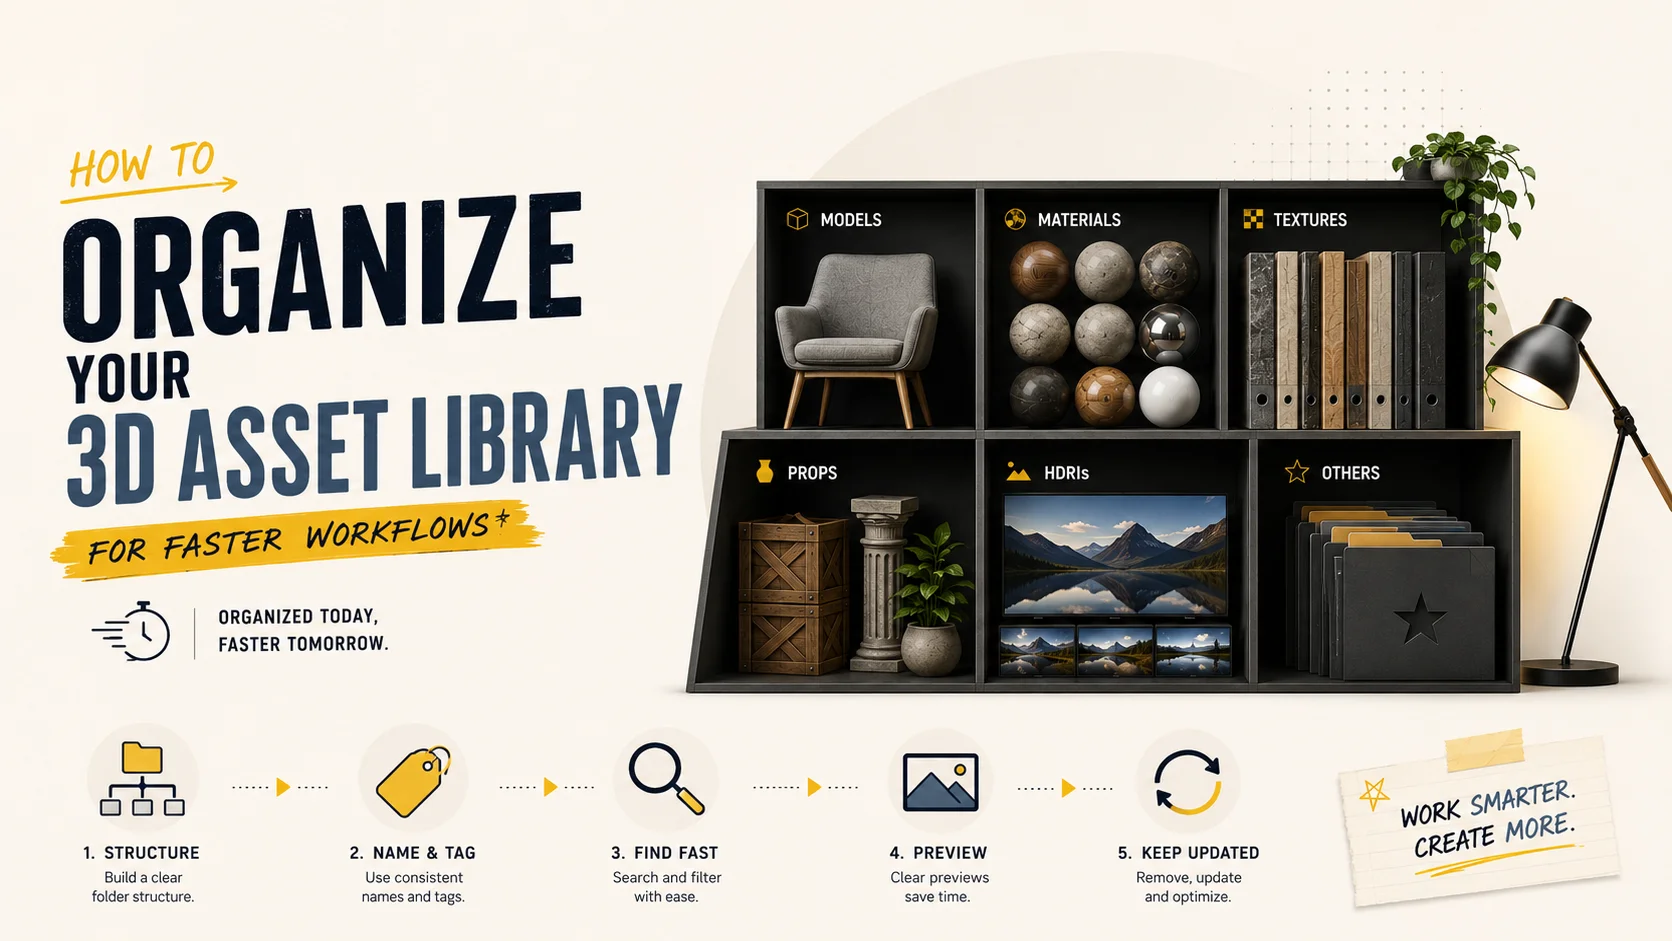
Step 1 - Build a Master Folder Structure
The foundation of any organised asset library is a clear, consistent folder hierarchy. The goal is simple: you should be able to find any asset in under 30 seconds without using search.
Here is a professional-grade folder structure that scales from solo freelancer to small studio:
/3D_Asset_Library
│
├── /Characters
│   ├── /Human
│   ├── /Creature
│   └── /Robot_Mech
│
├── /Environments
│   ├── /Urban
│   ├── /Nature
│   ├── /Interior
│   └── /Sci-Fi
│
├── /Props
│   ├── /Furniture
│   ├── /Vehicles
│   ├── /Weapons
│   ├── /Electronics
│   └── /Food_Drink
│
├── /Architecture
│   ├── /Residential
│   ├── /Commercial
│   └── /Structural_Elements
│
├── /Materials_Textures
│   ├── /PBR_Materials
│   ├── /Surfaces
│   │   ├── /Wood
│   │   ├── /Metal
│   │   ├── /Concrete
│   │   ├── /Fabric
│   │   └── /Glass
│   └── /Decals
│
├── /VFX
│   ├── /Particles
│   ├── /Simulations
│   └── /Post_Effects
│
├── /HDRIs
│   ├── /Outdoor
│   ├── /Indoor
│   └── /Studio
│
├── /Kitbash
│   ├── /Sci-Fi
│   ├── /Fantasy
│   └── /Industrial
│
└── /Project_Specific
    ├── /[ClientName_ProjectName_Year]
    └── /[ClientName_ProjectName_Year]
Key principles behind this structure:
Top-level by asset type, not by source. Do not create top-level folders for "Korvix3D", "CGTrader", or "Client Work". Source is irrelevant when you are searching for a specific type of asset. Organize by what the asset IS, not where it came from.
Keep project-specific assets separate. Assets created for a specific client brief belong in the Project_Specific folder, not the main library. They may not be reusable (due to licensing), and mixing them with your general library creates legal and organizational confusion.
Do not go deeper than three levels. Folders nested six layers deep are just as hard to navigate as no folders at all. Three levels maximum keeps the structure navigable.
Step 2 - Establish a Naming Convention and Never Break It
A consistent naming convention is the difference between a library you can navigate and one that requires an archaeological dig. Pick a convention, write it down, and apply it to every single asset that enters your library.
[Category]_[Descriptor]_[Variant]_[Resolution/LOD]_[Version]
Examples in practice:
prop_woodenChair_oak_4K_v01
char_humanMale_businessCasual_rigged_v02
env_urbanBuilding_apartment_LOD0_v01
mat_concreteCracked_weathered_2K_v01
hdri_outdoorSunset_warm_16K_v01
vfx_fireSmall_loop_v03
arch_doorway_arched_stone_v01
The Rules
Use underscores, not spaces. File paths with spaces cause errors in many 3D applications, game engines, and command-line tools. Underscores are safe everywhere.
Use camelCase for descriptors. It improves readability without spaces. woodenChair is cleaner than woodenchair or wooden-chair.
Always include a version number. Even if you think this is the final version. Especially if you think this is the final version. Use v01, v02 format rather than v1, v2 so that files sort correctly in alphabetical order (v09 before v10, not v9 before v10).
Include resolution or LOD where relevant. For textures and environment assets, noting 2K, 4K, or 8K in the filename saves you from opening files to check. For game assets, noting LOD0, LOD1, LOD2 is essential.
Be consistent with abbreviations. Define your abbreviations once and stick to them. prop, char, env, mat, arch, hdri, vfx, kit are clean, unambiguous, and easy to remember.
Step 3 - Store Preview Thumbnails Alongside Every Asset
This is the step most artists skip, and the one that makes the single biggest difference in day-to-day usability.
A preview thumbnail is a rendered or screenshot image showing what the asset looks like, stored in the same folder as the asset files. When you are browsing your library in a file manager that shows thumbnail previews (like Windows Explorer or macOS Finder), you can visually scan hundreds of assets in seconds instead of reading filenames.
How to Create Preview Thumbnails Efficiently
For individual assets: Take a simple turntable render in your DCC tool with a neutral grey background and basic three-point lighting. Render at 512×512 or 1024×1024. Save as a JPEG or PNG with the same base name as the asset.
prop_woodenChair_oak_4K_v01.fbx
prop_woodenChair_oak_4K_v01.jpg    ← preview thumbnail
For texture sets: A simple flat render of the material applied to a sphere or plane under neutral lighting is sufficient.
For kitbash sets: Render an assembled hero shot showing the variety of pieces in use.
Batch approach: If you are catching up on a large existing library, create a simple Blender script that auto-imports and renders turntable previews for an entire folder of FBX files. This can process hundreds of assets overnight.
Folder structure and naming cover 80% of organization needs. For power users managing large libraries, metadata and tagging add a crucial second layer of discoverability, especially for assets that could logically live in multiple categories.
For each asset, consider tracking:
Metadata Field | Example Values | Why It Matters |
|---|
Source | Korvix3D, Custom, ClientWork | Licensing clarity |
License | Commercial, Personal, Custom | Legal compliance |
Software | Blender, Maya, Universal | Compatibility |
Polygon Count | 1,200 / 45,000 | Performance planning |
Texture Resolution | 2K / 4K / 8K | Quality and file size |
Date Added | 2025-03 | Tracking recency |
Tags | medieval, stone, exterior | Search discoverability |
Project Used | ProjectName_Year | Usage history |
For solo artists:
Notion or Airtable - Build a simple asset registry spreadsheet with thumbnail previews, tags, and metadata. Free to start and surprisingly powerful.
Eagle App - A dedicated visual asset manager for creatives. Drag in your 3D assets, add tags, and search by color, tag, or filename. Supports 3D file previews via plugin.
Adobe Bridge - Free with Creative Cloud. Excellent for texture and material libraries due to strong visual preview support.
For small studios:
Anchorpoint - Purpose-built for creative teams. Version control, asset tagging, and team collaboration built in.
ftrack - Production tracking with asset management capabilities. Used by mid-size VFX and animation studios.
For large studios:
Step 5 - Separate Source Files From Deliverable Files
This is a structural distinction that saves enormous confusion over time.
Every asset should have two layers:
Source files - The original, editable project files. The .blend file, the .ma file, the ZBrush .zpr, the Substance .spp. These are your masters. They are large, application-specific, and not meant for distribution.
Deliverable files - The exported, ready-to-use versions. The .fbx, .gltf, .obj, and texture map PNGs. These are what actually get used in production.
Mixing these together creates chaos. A folder that contains a 400MB .blend file, a 12MB FBX, six 4K textures, three preview renders, and a backup from six months ago is not navigable.
The clean approach:
/prop_woodenChair_oak_4K_v01
├── /source
│   └── prop_woodenChair_oak_4K_v01.blend
├── /export
│   ├── prop_woodenChair_oak_4K_v01.fbx
│   ├── prop_woodenChair_oak_4K_v01.obj
│   └── prop_woodenChair_oak_4K_v01.glb
├── /textures
│   ├── prop_woodenChair_oak_albedo_4K.png
│   ├── prop_woodenChair_oak_normal_4K.png
│   ├── prop_woodenChair_oak_roughness_4K.png
│   └── prop_woodenChair_oak_ao_4K.png
└── prop_woodenChair_oak_4K_v01_preview.jpg
Clean, unambiguous, and immediately understandable to anyone on your team.
Step 6 - Set Up a Storage and Backup Architecture
An organised library is only as good as its availability. A single drive failure can erase years of accumulated assets.
The 3-2-1 Backup Rule
Follow the industry-standard 3-2-1 rule:
In practice for a 3D artist:
Primary working drive (NVMe SSD for fast access)
Local backup drive (external HDD, automated weekly backup)
Cloud backup (Backblaze B2, Google Drive, or similar)
Asset library access speed directly affects workflow speed. Keep your most-used assets on an SSD. Archive older or rarely used assets to HDD or cold cloud storage. The performance difference when loading high-res textures from an SSD versus a spinning disk is significant.
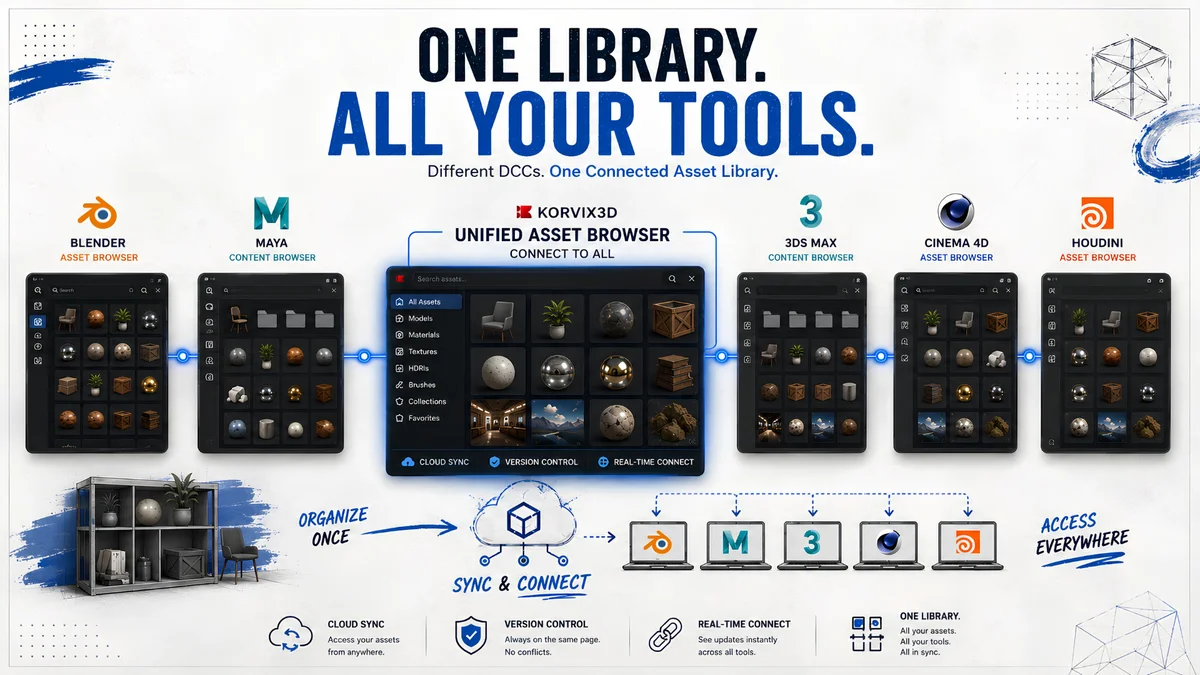
The final step is making your organized library actually accessible from inside your 3D software, because an organized folder on your desktop is far less useful than an organized library inside Blender or Maya.
Blender Asset Library: Blender's built-in asset library system (introduced in Blender 3.0) lets you mark any object, material, or world as a library asset and access it from the Asset Browser panel inside any Blender project. Point it at your organized folder structure and you have a native, visual asset browser inside Blender.
Maya Content Browser: Maya's Content Browser allows you to browse external folders visually, with preview thumbnails, directly from within Maya.
Bridge Plugins: The most seamless integration for subscription asset libraries is a native bridge plugin, like those offered by Korvix3D for Blender, Maya, Houdini, Cinema4D, and 3DS Max. Instead of managing downloaded files at all, you browse the full asset library directly from inside your software and import with a single click. No folder management, no format conversion, no manual texture reconnection.
For assets you source from a subscription platform, this approach completely eliminates the organizational overhead described in this guide, because the platform handles curation, naming, previews, and delivery for you.
[See how Korvix3D bridge plugins work →] https://www.korvix3d.com/docs/plugins
The Quick-Start Checklist
If your library is currently a mess and you want to start fixing it today without overhauling everything at once, follow this order:
Week 1 - Stop the bleeding
Create the master folder structure above
Apply it to everything you download from this point forward
Do not go back and reorganise old files yet
Week 2–3 - Tackle the backlog
Work through your existing assets folder by folder
Move files into the new structure as you encounter them
Add preview thumbnails to any asset you move
Week 4 - Add the metadata layer
Set up a simple Notion or Airtable asset register
Log your most-used assets first
Add licensing information to every asset, this is legally important
Ongoing - Maintain the system
Spend 10 minutes at the end of every project filing new assets properly
Run a quarterly audit of the library, delete duplicates, archive unused assets, update any metadata that has changed
It is worth noting that a well-designed subscription asset platform removes a significant portion of this organizational work entirely.
When you use a platform like Korvix3D, assets are already:
Named consistently
Organized by category and type
Tagged with relevant descriptors
Available with preview thumbnails
Delivered in your preferred format automatically via bridge plugin
Stored and served from the cloud, not your local drive
For artists who spend significant time sourcing and managing assets from multiple marketplaces and free sources, consolidating to a subscription platform is often the single highest-leverage thing they can do for workflow efficiency, before any folder restructuring ever happens.
[Explore the Korvix3D asset library →] https://www.korvix3d.com/assets
Frequently Asked Questions
How should I organise 3D assets on my hard drive? Organise by asset type at the top level (Characters, Props, Environments, Materials, etc.), then by sub-category. Use a consistent naming convention with underscores, version numbers, and resolution indicators. Store preview thumbnails alongside every asset. Keep source files and export files in separate subfolders.
What is the best software for managing a 3D asset library? For solo artists, Eagle App or a combination of a well-structured file system and Notion works well. For small teams, Anchorpoint is purpose-built for creative asset management. For large studios, Shotgrid is the industry standard.
Should I organise assets by source (where I downloaded them) or by type? Always by type. Organising by source (e.g. a folder per marketplace) means you need to remember where you got something to find it, which defeats the purpose. Organising by type means you always know where to look regardless of source.
How many levels deep should my folder structure be? Three levels maximum. Top-level category, sub-category, and asset folder. Deeper nesting becomes harder to navigate than a flat structure.
How do I handle assets with multiple valid categories? Store the asset in the most specific and frequently accessed category. Add a shortcut or alias in any secondary category where it logically belongs. In a metadata system, tag it with all relevant categories for searchability.
How do I organise textures and materials vs 3D models? Keep textures in a dedicated Materials_Textures top-level folder, organised by surface type. When a specific texture belongs to a specific model, also keep a copy in that model's asset folder. The top-level texture library is for standalone, reusable materials. Asset-specific textures live with their model.
Published by the Korvix3D Team Tags: 3d asset library organization, 3d asset management, 3d workflow productivity, 3d asset folder structure, 3d naming convention, digital asset management, 3d artist workflow, asset library tools, 3d file management, blender asset library
Picture this. You are mid-project, deadline looming, and you need that brick wall texture you used three months ago. You remember downloading it. You remember it looked perfect. But you have absolutely no idea where it lives on your hard drive.
Twenty minutes later, after digging through folders named "stuff", "final", "final_v2", and "NEW FINAL USE THIS ONE", you give up and download a replacement.
Sound familiar?
A disorganized 3D asset library is one of the single biggest hidden productivity killers in any creative workflow. It does not announce itself loudly. It bleeds your time slowly, a few minutes here, a frustrating search there, until hours of your week are quietly disappearing into the chaos of your own file system.
This guide gives you the complete system to fix that permanently. Folder structures, naming conventions, tagging, metadata, preview thumbnails, and the tools that tie it all together. Whether you are a solo freelancer with a modest library or a studio managing thousands of assets across a team, this framework scales to fit.
Why Most 3D Artists Have Chaotic Asset Libraries
Before we build the solution, it is worth understanding why this problem is so universal.
Assets come from too many places at once. You download from marketplaces, rip from old projects, export from client work, buy packs, receive files from collaborators, and generate procedural assets. Each source has its own naming convention and folder structure, or no structure at all.
There is never a good time to organise. When you are in the middle of a project, organisation feels like a distraction. When the project ends, you move straight to the next one. The library never gets the attention it needs.
Software does not enforce structure. Unlike a DAM (Digital Asset Management) system used in large studios, most 3D artists work directly off their file system. Your operating system will let you name a folder anything and put it anywhere. Chaos is always one bad save dialog away.
Asset libraries grow fast. A library that is manageable at 500 files becomes unworkable at 5,000. Artists who do not build a scalable system early find themselves in trouble quickly.
The good news: fixing this is not complicated. It just requires a system applied consistently.
Step 1 - Build a Master Folder Structure
The foundation of any organised asset library is a clear, consistent folder hierarchy. The goal is simple: you should be able to find any asset in under 30 seconds without using search.
Here is a professional-grade folder structure that scales from solo freelancer to small studio:
Key principles behind this structure:
Top-level by asset type, not by source. Do not create top-level folders for "Korvix3D", "CGTrader", or "Client Work". Source is irrelevant when you are searching for a specific type of asset. Organize by what the asset IS, not where it came from.
Keep project-specific assets separate. Assets created for a specific client brief belong in the Project_Specific folder, not the main library. They may not be reusable (due to licensing), and mixing them with your general library creates legal and organizational confusion.
Do not go deeper than three levels. Folders nested six layers deep are just as hard to navigate as no folders at all. Three levels maximum keeps the structure navigable.
Step 2 - Establish a Naming Convention and Never Break It
A consistent naming convention is the difference between a library you can navigate and one that requires an archaeological dig. Pick a convention, write it down, and apply it to every single asset that enters your library.
The Recommended Naming Formula
Examples in practice:
The Rules
Use underscores, not spaces. File paths with spaces cause errors in many 3D applications, game engines, and command-line tools. Underscores are safe everywhere.
Use camelCase for descriptors. It improves readability without spaces.
woodenChairis cleaner thanwoodenchairorwooden-chair.Always include a version number. Even if you think this is the final version. Especially if you think this is the final version. Use v01, v02 format rather than v1, v2 so that files sort correctly in alphabetical order (v09 before v10, not v9 before v10).
Include resolution or LOD where relevant. For textures and environment assets, noting 2K, 4K, or 8K in the filename saves you from opening files to check. For game assets, noting LOD0, LOD1, LOD2 is essential.
Be consistent with abbreviations. Define your abbreviations once and stick to them.
prop,char,env,mat,arch,hdri,vfx,kitare clean, unambiguous, and easy to remember.Step 3 - Store Preview Thumbnails Alongside Every Asset
This is the step most artists skip, and the one that makes the single biggest difference in day-to-day usability.
A preview thumbnail is a rendered or screenshot image showing what the asset looks like, stored in the same folder as the asset files. When you are browsing your library in a file manager that shows thumbnail previews (like Windows Explorer or macOS Finder), you can visually scan hundreds of assets in seconds instead of reading filenames.
How to Create Preview Thumbnails Efficiently
For individual assets: Take a simple turntable render in your DCC tool with a neutral grey background and basic three-point lighting. Render at 512×512 or 1024×1024. Save as a JPEG or PNG with the same base name as the asset.
For texture sets: A simple flat render of the material applied to a sphere or plane under neutral lighting is sufficient.
For kitbash sets: Render an assembled hero shot showing the variety of pieces in use.
Batch approach: If you are catching up on a large existing library, create a simple Blender script that auto-imports and renders turntable previews for an entire folder of FBX files. This can process hundreds of assets overnight.
Step 4 - Use a Metadata and Tagging System
Folder structure and naming cover 80% of organization needs. For power users managing large libraries, metadata and tagging add a crucial second layer of discoverability, especially for assets that could logically live in multiple categories.
What Metadata to Track
For each asset, consider tracking:
Metadata Field
Example Values
Why It Matters
Source
Korvix3D, Custom, ClientWork
Licensing clarity
License
Commercial, Personal, Custom
Legal compliance
Software
Blender, Maya, Universal
Compatibility
Polygon Count
1,200 / 45,000
Performance planning
Texture Resolution
2K / 4K / 8K
Quality and file size
Date Added
2025-03
Tracking recency
Tags
medieval, stone, exterior
Search discoverability
Project Used
ProjectName_Year
Usage history
Tools for Asset Management
For solo artists:
Notion or Airtable - Build a simple asset registry spreadsheet with thumbnail previews, tags, and metadata. Free to start and surprisingly powerful.
Eagle App - A dedicated visual asset manager for creatives. Drag in your 3D assets, add tags, and search by color, tag, or filename. Supports 3D file previews via plugin.
Adobe Bridge - Free with Creative Cloud. Excellent for texture and material libraries due to strong visual preview support.
For small studios:
Anchorpoint - Purpose-built for creative teams. Version control, asset tagging, and team collaboration built in.
ftrack - Production tracking with asset management capabilities. Used by mid-size VFX and animation studios.
For large studios:
Shotgrid (formerly Shotgun) - Autodesk's production management platform. Industry standard for large VFX and animation studios.
Kitsu - Open-source production tracker with asset management.
Step 5 - Separate Source Files From Deliverable Files
This is a structural distinction that saves enormous confusion over time.
Every asset should have two layers:
Source files - The original, editable project files. The .blend file, the .ma file, the ZBrush .zpr, the Substance .spp. These are your masters. They are large, application-specific, and not meant for distribution.
Deliverable files - The exported, ready-to-use versions. The .fbx, .gltf, .obj, and texture map PNGs. These are what actually get used in production.
Mixing these together creates chaos. A folder that contains a 400MB .blend file, a 12MB FBX, six 4K textures, three preview renders, and a backup from six months ago is not navigable.
The clean approach:
Clean, unambiguous, and immediately understandable to anyone on your team.
Step 6 - Set Up a Storage and Backup Architecture
An organised library is only as good as its availability. A single drive failure can erase years of accumulated assets.
The 3-2-1 Backup Rule
Follow the industry-standard 3-2-1 rule:
3 copies of your data
2 different storage media types
1 offsite or cloud backup
In practice for a 3D artist:
Primary working drive (NVMe SSD for fast access)
Local backup drive (external HDD, automated weekly backup)
Cloud backup (Backblaze B2, Google Drive, or similar)
Storage Performance Matters
Asset library access speed directly affects workflow speed. Keep your most-used assets on an SSD. Archive older or rarely used assets to HDD or cold cloud storage. The performance difference when loading high-res textures from an SSD versus a spinning disk is significant.
Step 7 - Integrate With Your DCC Tool
The final step is making your organized library actually accessible from inside your 3D software, because an organized folder on your desktop is far less useful than an organized library inside Blender or Maya.
Blender Asset Library: Blender's built-in asset library system (introduced in Blender 3.0) lets you mark any object, material, or world as a library asset and access it from the Asset Browser panel inside any Blender project. Point it at your organized folder structure and you have a native, visual asset browser inside Blender.
Maya Content Browser: Maya's Content Browser allows you to browse external folders visually, with preview thumbnails, directly from within Maya.
Bridge Plugins: The most seamless integration for subscription asset libraries is a native bridge plugin, like those offered by Korvix3D for Blender, Maya, Houdini, Cinema4D, and 3DS Max. Instead of managing downloaded files at all, you browse the full asset library directly from inside your software and import with a single click. No folder management, no format conversion, no manual texture reconnection.
For assets you source from a subscription platform, this approach completely eliminates the organizational overhead described in this guide, because the platform handles curation, naming, previews, and delivery for you.
[See how Korvix3D bridge plugins work →] https://www.korvix3d.com/docs/plugins
The Quick-Start Checklist
If your library is currently a mess and you want to start fixing it today without overhauling everything at once, follow this order:
Week 1 - Stop the bleeding
Create the master folder structure above
Apply it to everything you download from this point forward
Do not go back and reorganise old files yet
Week 2–3 - Tackle the backlog
Work through your existing assets folder by folder
Move files into the new structure as you encounter them
Add preview thumbnails to any asset you move
Week 4 - Add the metadata layer
Set up a simple Notion or Airtable asset register
Log your most-used assets first
Add licensing information to every asset, this is legally important
Ongoing - Maintain the system
Spend 10 minutes at the end of every project filing new assets properly
Run a quarterly audit of the library, delete duplicates, archive unused assets, update any metadata that has changed
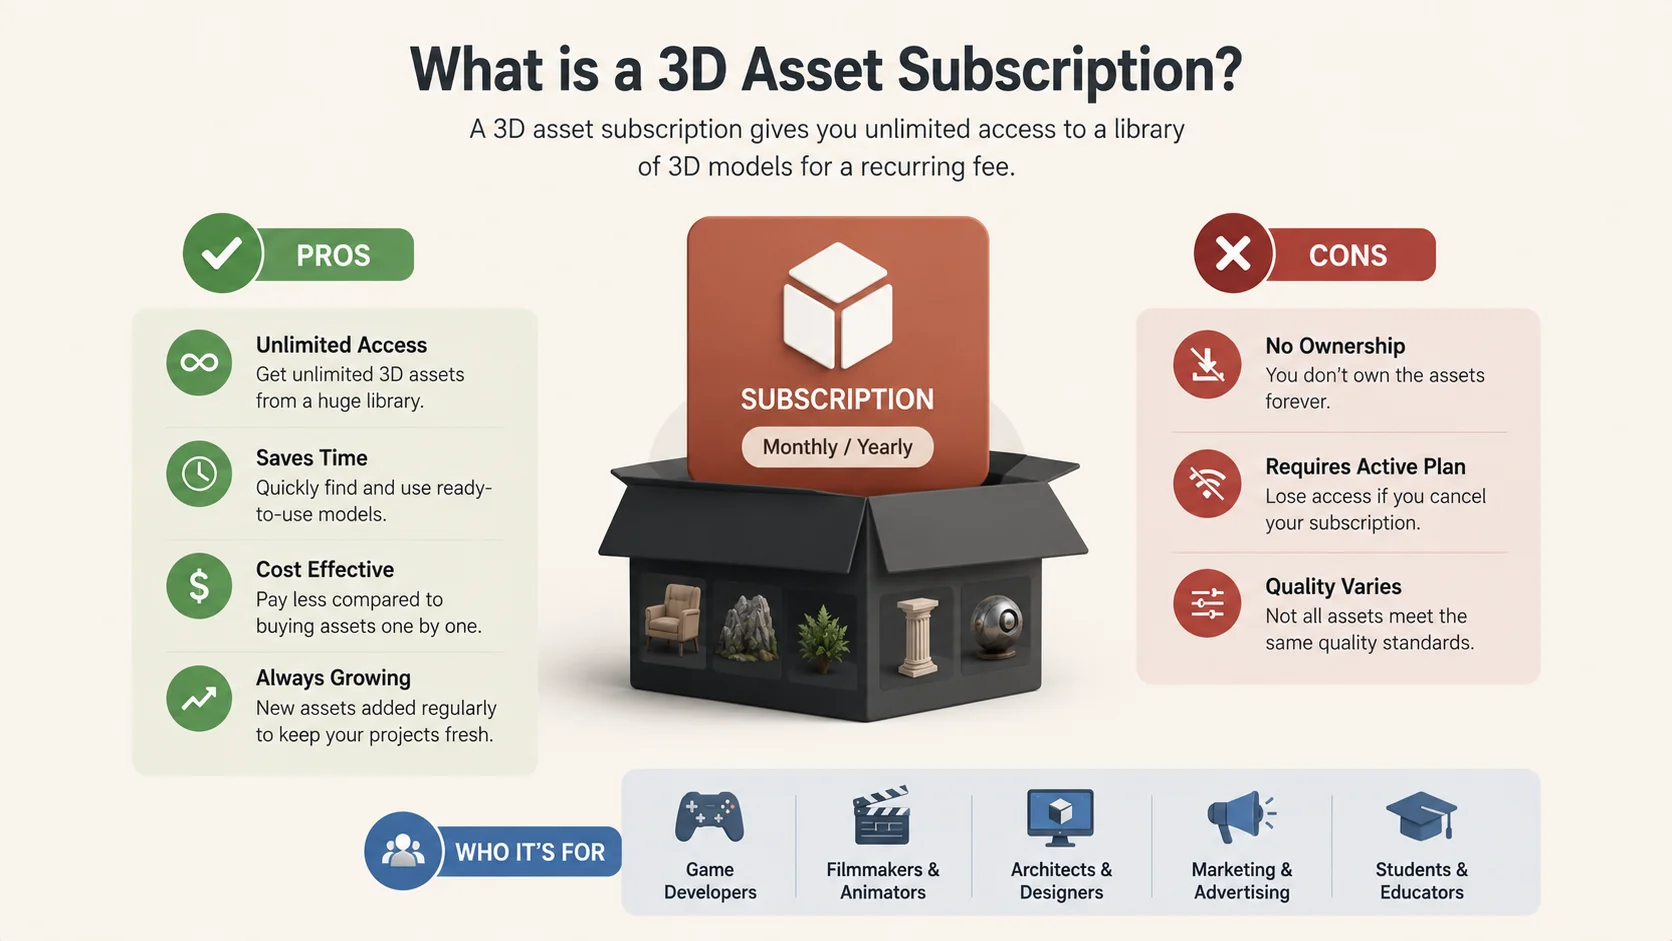
How Subscription Platforms Change the Equation
It is worth noting that a well-designed subscription asset platform removes a significant portion of this organizational work entirely.
When you use a platform like Korvix3D, assets are already:
Named consistently
Organized by category and type
Tagged with relevant descriptors
Available with preview thumbnails
Delivered in your preferred format automatically via bridge plugin
Stored and served from the cloud, not your local drive
For artists who spend significant time sourcing and managing assets from multiple marketplaces and free sources, consolidating to a subscription platform is often the single highest-leverage thing they can do for workflow efficiency, before any folder restructuring ever happens.
[Explore the Korvix3D asset library →] https://www.korvix3d.com/assets
Frequently Asked Questions
How should I organise 3D assets on my hard drive? Organise by asset type at the top level (Characters, Props, Environments, Materials, etc.), then by sub-category. Use a consistent naming convention with underscores, version numbers, and resolution indicators. Store preview thumbnails alongside every asset. Keep source files and export files in separate subfolders.
What is the best software for managing a 3D asset library? For solo artists, Eagle App or a combination of a well-structured file system and Notion works well. For small teams, Anchorpoint is purpose-built for creative asset management. For large studios, Shotgrid is the industry standard.
Should I organise assets by source (where I downloaded them) or by type? Always by type. Organising by source (e.g. a folder per marketplace) means you need to remember where you got something to find it, which defeats the purpose. Organising by type means you always know where to look regardless of source.
How many levels deep should my folder structure be? Three levels maximum. Top-level category, sub-category, and asset folder. Deeper nesting becomes harder to navigate than a flat structure.
How do I handle assets with multiple valid categories? Store the asset in the most specific and frequently accessed category. Add a shortcut or alias in any secondary category where it logically belongs. In a metadata system, tag it with all relevant categories for searchability.
How do I organise textures and materials vs 3D models? Keep textures in a dedicated Materials_Textures top-level folder, organised by surface type. When a specific texture belongs to a specific model, also keep a copy in that model's asset folder. The top-level texture library is for standalone, reusable materials. Asset-specific textures live with their model.
Published by the Korvix3D Team Tags: 3d asset library organization, 3d asset management, 3d workflow productivity, 3d asset folder structure, 3d naming convention, digital asset management, 3d artist workflow, asset library tools, 3d file management, blender asset library